
This activity was designed for ages 8 and older but can be adapted for beginners to experts and for younger kids with adult assistance. Please note that this project involves using scissors to cut paper.
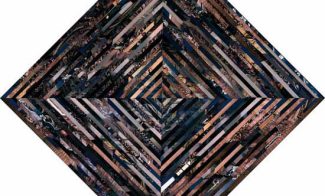
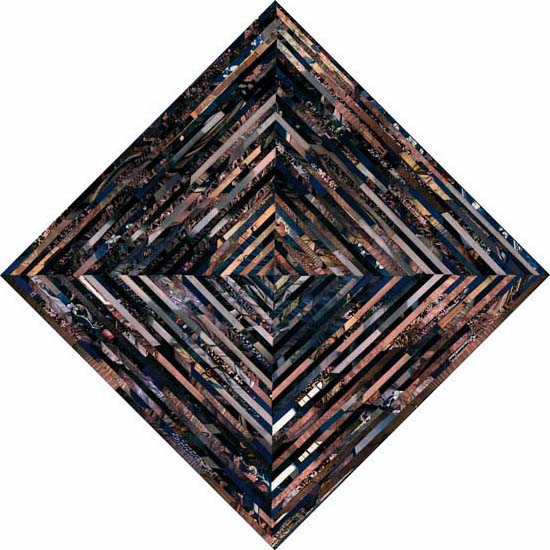
Many artists use everyday materials found around them to create art that conveys different things about the personal and the profound. Sara VanDerBeek’s Continuum Blue is a photograph of a collage, an artwork made by combining different materials (often through cutting and pasting), and shows that it is a great way to create something visually and spatially intriguing. In Continuum Blue, it looks as though you’re looking through a kaleidoscope! We invite you to create your own kaleidoscopic collage and discover how color, texture, pattern, and paper size can create a dazzling effect.
You will need:
- Printed template (download)
- 2D Collage materials – this can be anything you want
- Paper for backing, color is your choice (this is what your finished product will be glued to!)
- Scissors
- Glue stick, glue, clear tape or rubber cement
- Pencil and ruler (optional)
Steps:
1. Print and cut out the template of your choosing, cutting out each section into smaller triangle sections. One side of each triangle will have numbers and arrows and the other side will be blank. (The numbers help to keep track of your triangles and the arrows will help you assemble your triangles at the end.)
![Art-Lab_[KCollage]_Step[1]-combined.png](/wp-content/uploads/2023/03/art-labkcollagestep1-combined.png)
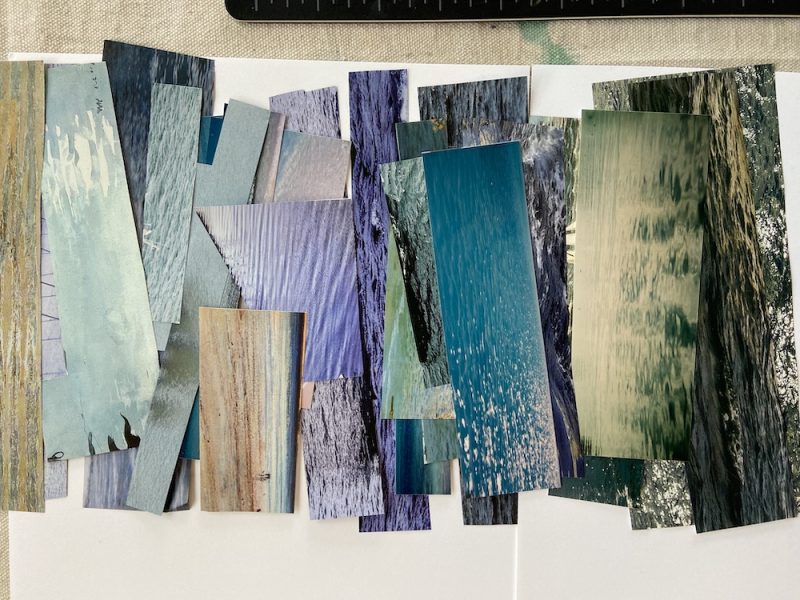
2. Collect your 2D collage materials.
Keep in mind that you will need pieces that are long enough to cover the width of each triangle section. Some examples of things that you can use are newspapers, old photos, magazines, and flyers — Experiment with a range of 2D materials! Perhaps choose a theme for your piece and collect materials based on a color or idea that unites everything.
TIP: If you do not have collaging materials available, you can create your own by drawing on plain or colorful paper and cutting that up to use as collage material.
![Art Lab_[KCollage]_Step[2].jpeg](/wp-content/uploads/2023/03/art-labkcollagestep2-1.jpeg)
3. Cut your collage materials into long strips so that they will fit across the width of your triangle sections. Your strips can be narrow or wide but if you want to make them all equal for a more uniform look, a ruler may be useful.
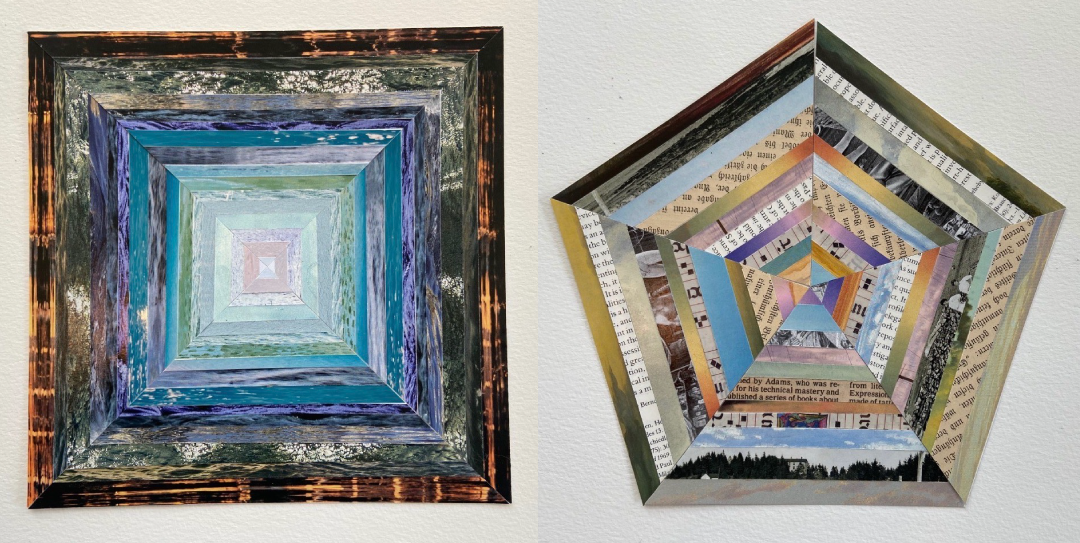
4. Glue your collage strips onto the blank sides of your triangle sections. (The side with the number and arrow should be on the back.) Glue your first strip along the edge of the longest side of the triangle and work your way to the opposite corner. Don’t worry if the strips hang over the edge (we will trim later). You can create a uniform design by repeating the same pattern of collage strips on each of your triangles, or experiment by creating a new pattern for each.
5. Once you have covered each of your triangle sections with your collage strips, carefully cut along the edge of each triangle to trim off any overhang.
![Art Lab_[KCollage]_Step[4+5].jpeg](/wp-content/uploads/2023/03/art-labkcollagestep45-1.jpeg)
6. Connect your triangles and assemble them with the arrows pointing toward the center. You can either tape them together or glue them onto a background of your choosing.
![Art-Lab_[KCollage]_Step[6]-combined.png](/wp-content/uploads/2023/03/art-labkcollagestep6-combined-1.png)
This activity was developed by Hallie Selinger, Visitor Experience Manager.