Photo by Pamela Murray
Photo by Pamela Murray
|
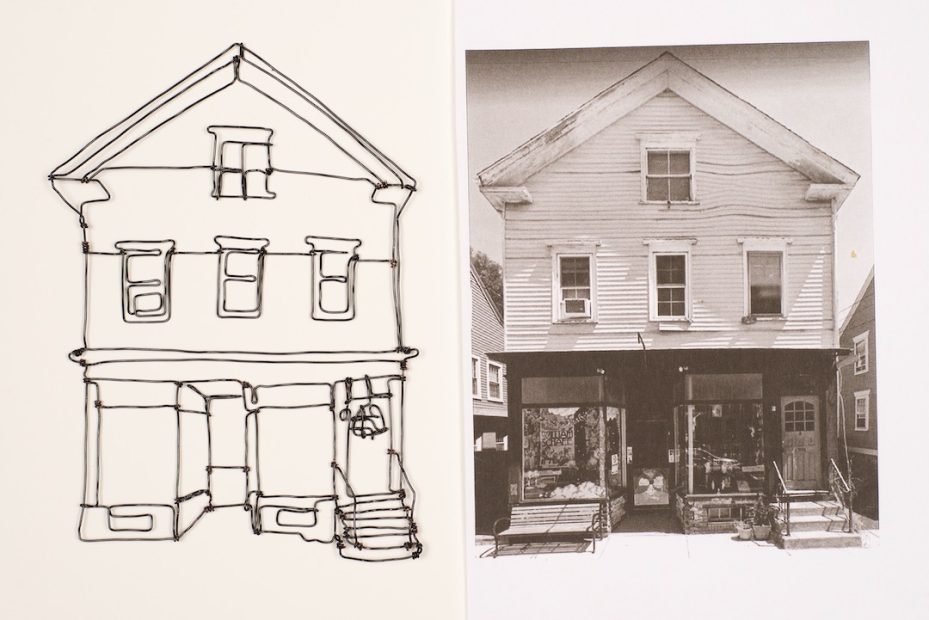
We all have places where we have been, where we want to be, and where we are right now. A place can cement memories, bring us comfort, and instill hope. In this project, you will create a line drawing with wire of a place from your past, present, or future that represents a moment of you. NOTE: This activity requires scissors and wire which can be sharp. |
Todos tenemos lugares en los que hemos estado, en los que queremos estar y en los que nos encontramos ahora mismo. Un lugar puede consolidar recuerdos, brindar consuelo e infundir esperanza. En este proyecto, crearás un dibujo lineal con alambre de un lugar del pasado, el presente o el futuro que represente un momento de tu vida. NOTA: Esta actividad requiere el uso de tijeras y alambre que pueden ser afilados. |
Materials / Materiales:
Instructions / Instrucciones:
|
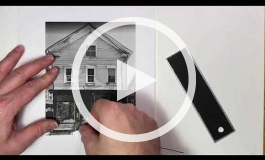
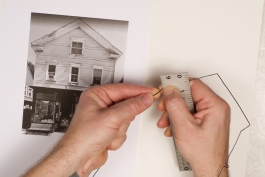
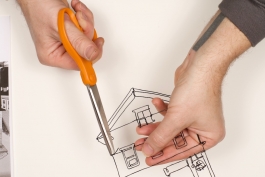
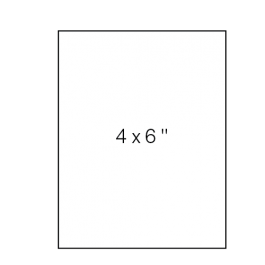
1. Choose a photo of a house or building that has been a part of your life. Print out or copy the photo in the exact size you want your wire drawing to be. (The wire will scratch the surface of your photo, so don’t use a copy that you want to keep.) You can also draw the house or building on a piece of paper roughly 5” × 7”. |
1. Elige una fotografía de una casa o de un edificio que haya sido parte de tu vida. Imprime o fotocopia la fotografía en el mismo tamaño que deseas usar para el dibujo. (El alambre raspará la superficie de la fotografía, así que no uses una copia que quieras conservar.) También puedes dibujar la casa o el edificio en un papel de alrededor de 5” × 7” (13 × 18 cm). |
|
|
|
|
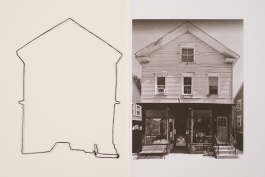
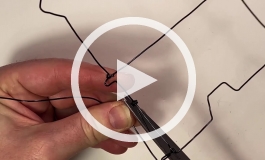
2. Outline the building with wire. Leaving an extra inch of wire at the start, begin in the lower right corner and trace around the structure. (You’ll use the extra inch of wire at the start for wrapping after getting all the way around.) |
2. Traza el contorno del edificio con alambre. Dejando una pulgada adicional de alambre al inicio, comienza en la esquina inferior derecha y traza el contorno de la estructura. (Usarás la pulgada adicional de alambre del inicio para cerrar después de dar toda la vuelta.) |
|
|
|
|
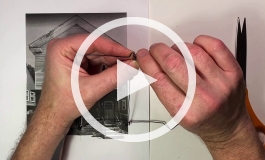
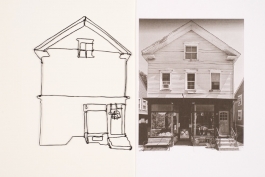
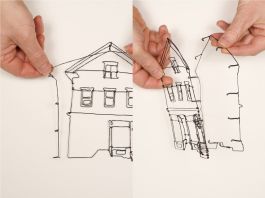
3. Outline the interior details. This can be done separately and then added to the whole piece (be sure to leave extra wire at the ends you want to attach) or worked from the same wire used for the building outline. |
3. Traza el contorno de los detalles del interior. Esto puedes hacerlo por separado y luego agregarlo a la pieza entera (asegúrate de dejar alambre adicional en los extremos que deseas unir) o con el mismo alambre que has utilizado para el contorno del edificio. |
|
|
|
|
4. Optional: Make a backing by outlining the building again but add a folded tab of about ¾ of an inch every 1 ½ inches or so. You will then fold these tabs around your first outline from the back to give your wire drawing more structure. |
4. Opcional: Para crear un apoyo, vuelve a trazar el contorno del edificio, pero agrega una pestaña doblada de alrededor de ¾ de pulgada (2 cm) cada 1 ½ pulgadas (4 cm) aproximadamente. Luego, dobla estas pestañas por detrás del primer contorno para darle más estructura al dibujo lineal. |
|

|
|
5. Use a marker or paint that matches the color of your wire to cover up the spots where the plastic coating has scratched off. |
5. Con un marcador o con pintura que sea del color del alambre, cubre los lugares donde se haya raspado el revestimiento plástico. |
|
Tips:
|
Consejos:
|
|
CW Roelle draws three-dimensional line drawings with wire. His images are studies of moods, thoughts, life, place, shape, and line. A graduate of the Maryland Institute College of Art and a MacColl Johnson Fellow, he lives and works in western Rhode Island. |
CW Roelle crea dibujos lineales tridimensionales con alambre. Sus imágenes son estudios de estados de ánimo, pensamientos, vidas, lugares, formas y líneas. Graduado en el Maryland Institute College of Art y destinatario de la beca MacColl Johnson, vive y trabaja en el oeste de Rhode Island. |
|
Share your artwork on social media with #ICAartlab |
Comparte tu obra de arte en las redes sociales con #ICAartlab
|
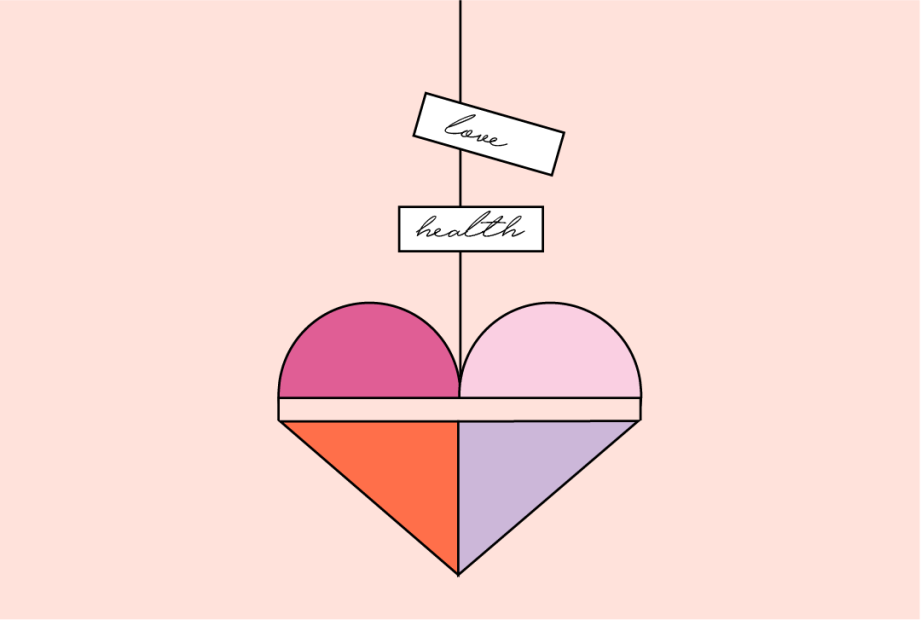
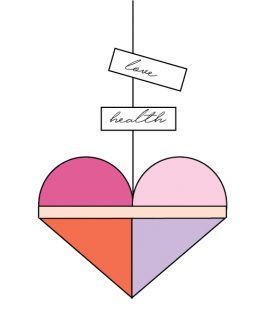
Hanging Pocket Hearts is inspired by Cornelia Parker’s artwork Hanging Fire (Suspected Arson), which represents the vulnerabilities of being human and the challenges of our time. Focus on hope and joy by creating one heart or a collection of hearts. Hang somewhere special to inspire you each day.
This activity is designed for children ages 5 and up and their grownups to work on together at home.
Materials:
 String or yarn |
|||
|
1. |
|
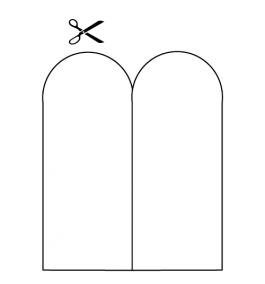
| 2. Fold the paper in half, bringing the long edges to meet. Cut a semicircle at the top as shown. Reopen the paper and lay it flat on your work surface. |
|
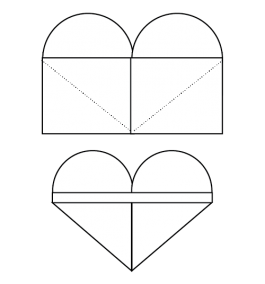
| 3. Fold the bottom edge of the paper up to the base of the semicircle. Take the bottom left corner and fold it to the center; do the same with the bottom right corner. Then fold the remaining strip down. Tuck the corners of the strip to the back side of the heart to secure the pocket. |
|
|
|
4. Decorate using drawing materials. On small pieces of paper, write or draw what you are thankful for or the emotions you are feeling. Tuck these into your heart or attach to the string. Glue or tape your heart to your string and hang it somewhere special! |
TIPS: To make a precise heart pocket, fold slowly and thoughtfully. Use your fingernails or the edge of a pencil to firmly crease your folds. You can make smaller or larger heart pockets by keeping the same measurement ratio. Try working with a piece of paper that is 2” x 3” or 8” x 12”.
This activity was created by Sergio Salicio-Lupiañez, Visitor Assistant.
Share your art with friends and family and on social media with #ICAArtLab or email us at familyprograms@icaboston.org.
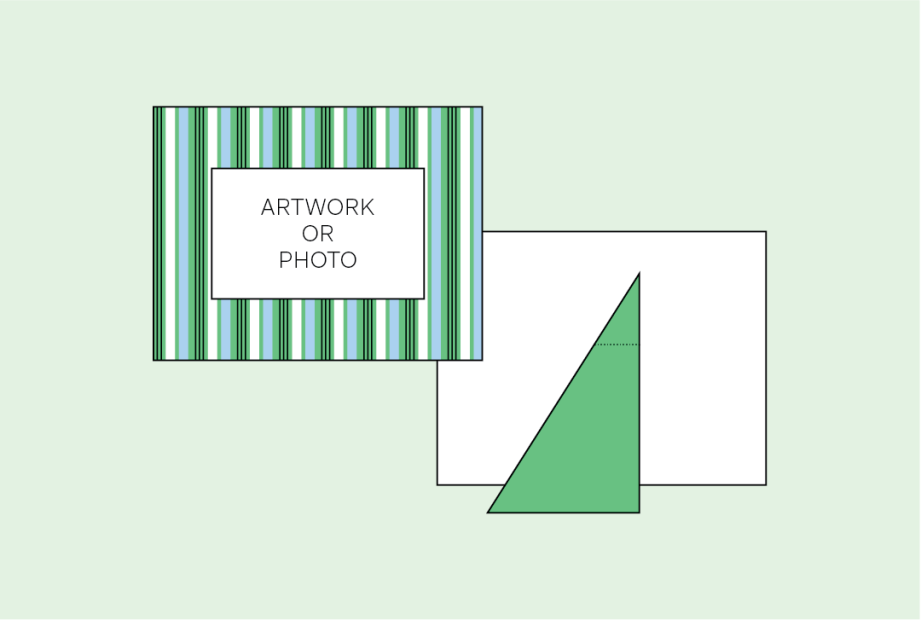
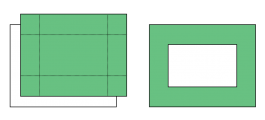
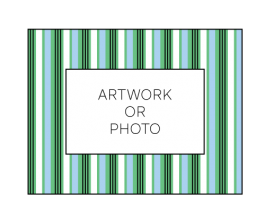
Inspired by the 30+ portraits hanging in i’m yours: Encounters with Art in Our Times, this activity invites you to create your own handmade picture frame with recycled materials. Make a personalized frame for one of your favorite photographs or even your own drawing.
This activity is designed for children ages 5 and up and their grownups to work on together at home. Please note that this project involves using scissors to cut cardboard.
Materials:
|
|
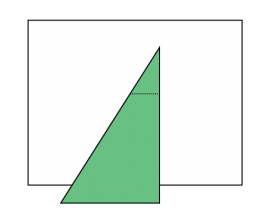
Steps: 1. |
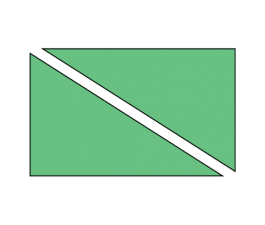
| 2. Cut a stand for your frame: Using a new piece of cardboard, measure and cut a rectangle that is roughly half the size of your frame. Using a pencil and ruler, draw a line from the upper left corner of the rectangle to the bottom right corner. Next, cut on the line. You only need one of the triangles for your frame. |
|
|
|
3. Using drawing materials, decorate the frame. Center your artwork on the back of the frame. Place the front of the frame on top so that your photo appears through the opening. Adjust until artwork is centered, then glue or tape the artwork in place onto the back. Tape will make it easier to change drawings or pictures in the frame. |
|
|
4. Use glue or tape to attach the triangular piece of cardboard to the back of the frame. Attach the narrowest part of the triangle to the center of the backing for the frame to stand. Bend the cardboard stand as needed for the best angle for your frame. |
This activity was created by Sergio Salicio-Lupiañez, Visitor Assistant.
Share your art with friends and family and on social media with #ICAArtLab or email us at familyprograms@icaboston.org.

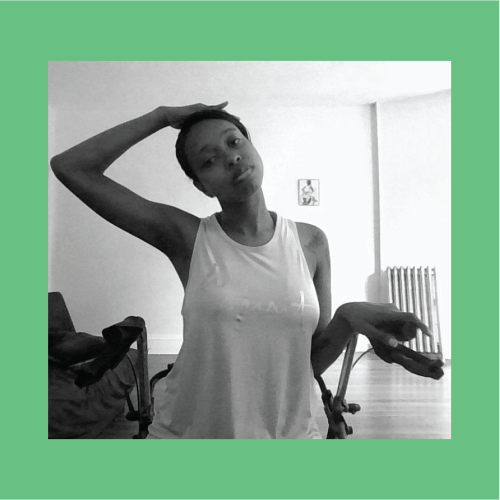
Courtesy of Ellice Patterson of Abilities Dance Boston
|
Founder and Director of Abilities Dance Boston Ellice Patterson will take you through gentle stretching for every day. She will also walk you through telling a story through movement that is accessible for all bodies! |
La fundadora y directora de Abilities Dance Boston te guiará para hacer un estiramiento suave todos los días. También te introducirá en la narración a través del movimiento que sea accesible para todo tipo de cuerpo. |
Materials / Materiales:
Only your body!
¡Solo el cuerpo!
|
Note from Ellice: Please adapt all of these movements to whatever works for you. I use a mobility aid, so experiment how you can adapt if you use different mobility aids or, if you are a nondisabled person, how you can translate. Have fun and be creative! |
Nota de Ellice: Adapta estos movimientos a lo que funcione para ti. Yo uso una ayuda para la movilidad, así que prueba cómo se pueden hacer adaptaciones si se usan diferentes ayudas de movilidad o, si no eres una persona con discapacidad, mira cómo puedes interpretarlo. ¡Diviértete y usa tu creatividad! |
Stretch / Estiramientos:
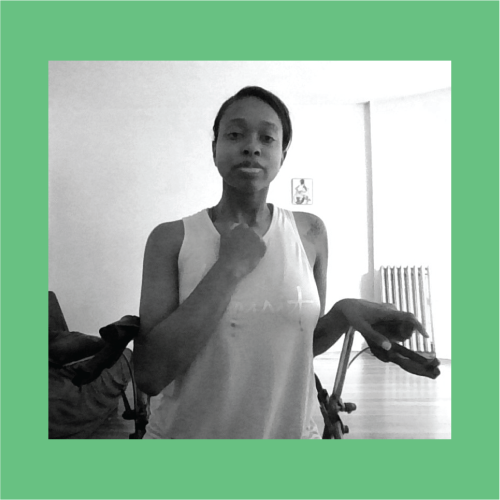 |
1. Start with making a fist and placing it against your chest. Then take four deep, slow breaths in and out. Use this time to push out all of the negative internal and external thoughts and just focus on being in your body. 1. Para comenzar, coloca el puño contra el pecho. Luego toma cuatro respiraciones, inhalando y exhalando de manera lenta y profunda. Durante este tiempo, libérate de todos los pensamientos negativos internos y externos, y concéntrate solamente en estar con el cuerpo. |
|
2. Take your hand and gently stretch your head side to side. Then roll your head slowly twice in both directions. 2. Apoya la mano sobre un lado de la cabeza y haz estiramientos de un lado a otro. Luego gira la cabeza lentamente dos veces en ambas direcciones. |
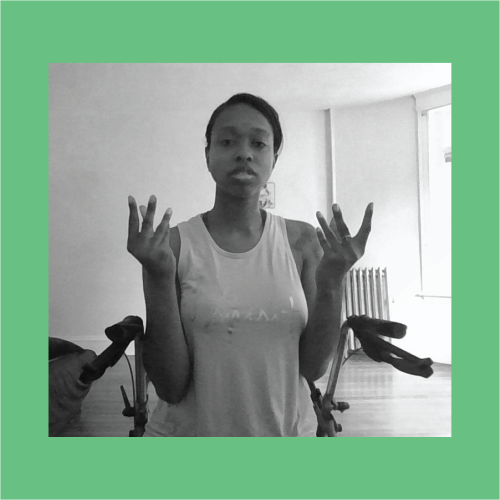 |
3. Take your hands and curl as if you’re wrapping your hand around an ice cream cone finger by finger. Energize through your finger tips and build warmth in your hands. 3. Toma tus manos y haz como si estuvieras envolviendo tus manos alrededor de un cono de helado, dedo por dedo. Siente la energía a través de los dedos y acumula calor en las manos. |
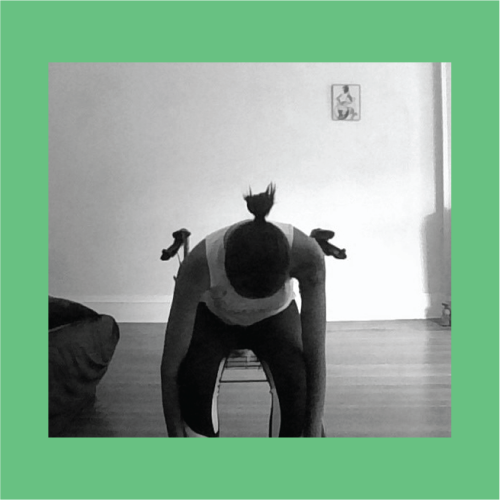 |
4. Take a stretch, bending forward as far as is comfortable and stay there for 5 sec — onds. If standing, ensure legs are straight and for an extra stretch bend your knees 5 times while bent over. Rise and take a stretch bending backward as far as is comfortable and stay for 5 seconds. 4. Estírate, inclinándote hacia adelante tanto como te resulte cómodo y permanece en esa posición durante 5 segundos. Si estas de pie, asegúrate de tener las piernas extendidas, y si necesitas estirarte un poco más, flexiona las rodillas 5 veces a medida que te inclinas. Levántate e inclínate hacia atrás tanto como te resulte cómodo y permanece en esa posición durante 5 segundos. |
|
Ellice Patterson founded Abilities Dance in 2017 as a space for diverse artists to train and perform. Through their work, they use art as a tool to promote intersectional disability rights. They have performed at the MFA, Peabody Essex Museum, Wimberly Theatre at the BCA, and Gibney Dance in NYC, among other venues. |
Ellice Patterson fundó Abilities Dance en 2017 como un espacio de capacitación y actuación para artistas diversos. A través de su trabajo, usan el arte como una herramienta para promover los derechos de diversas clases de discapacidad. Han actuado en el MFA, el Museo Peabody Essex, el Teatro Wimberly en el BCA y Gibney Dance en la ciudad de Nueva York, entre otros lugares. |
|
Find Abilities Dance Boston on social media on Facebook and Instagram. Find where they will be next at abilitiesdanceboston.org |
Descubre a Abilities Dance Boston en las redes sociales, en Facebook e Instagram. Obtén información sobre dónde actuarán próximamente en abilitiesdanceboston.org |
John Houck, Petals and Interleaves, 2016. Archival pigment print, 27 × 32 inches (68.6 × 81.3 cm). Promised gift of Abigail Ross Goodman and Mark Goodman. Courtesy the artist and On Stellar Rays. © John Houck
This activity is recommended for children ages 5 and up, and is a great activity to work on as a family.
By way of riddles and rhymes, explore our current moment and reimagine the future with your family! During this activity, you’ll collect household objects and build a temporary family sculpture to capture and reflect on for years to come.
Materials:
Directions
Work together to try and solve these riddles:
|
1. What is Black and White and Read all over? A. An artwork B. A family treasure C. Music D. Newspaper |
2. What is always in front of you, but can’t be seen? A. At-home recycling machine B. Time-travel portals C. The Future D. Gold |
|
3. It belongs to you, but other people use it more than you do. What is it? A. Clothes B. Your name C. Toys D. Instruments |
4. What is so fragile that saying its name breaks it? A. Yosemite! B. Mirror C. Silence D. Crystal Lake |
Compare your answers with the hidden correct answers. How did you do?
Explore your home or surroundings to find objects that represent each riddle answer.
Discuss the significance of each object. Here are some questions to explore while searching:
|
A newspaper tells us what’s going on in the world. What object(s) around you represent what’s happening in our world? A book, a magazine, a painting? |
What does the future look like to you? What objects around you represent the future you want to see? A calendar, a clock, flower seeds, a full cup of water? |
|
What objects represent your identity? A school picture, something you made that you’re proud of, a uniform with your name on it? |
What do you do to relax or feel peaceful? What objects can represent this feeling? A book, a pillow, a favorite stuffed animal? |
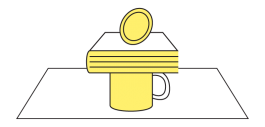
Assemblage
Once you have collected all your objects, arrange them in an interesting way. Try stacking them in a tower, or overlapping objects to hide secrets or show their importance. What other interesting ways can you showcase your objects? This action is called making an assemblage, which is how some contemporary artists create sculptures today.
Photograph your work!
Photograph your assemblage to keep and reflect on in the future. Post it online to share with your friends, family, and community. Once you have collected all your objects, arrange them in an interesting way. Try stacking them in a tower, or overlapping objects to hide secrets or show their importance. What other interesting ways can you showcase your objects? This action is called making an assemblage, which is how some contemporary artists create sculptures today.
Photo Tips:
Gerald L. Leavell II, M.F.A. is a community artist and arts educator based in Dallas, TX and Baltimore, MD. His practice is interdisciplinary in approach and often conceptual by nature. As a studio artist, Leavell mostly enjoys collage and assemblage—experimenting with materials, objects, and mediums to create…a “something.”
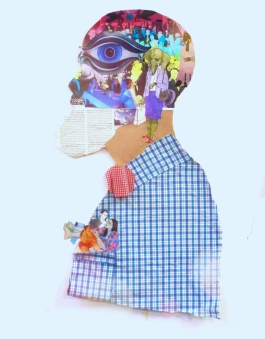
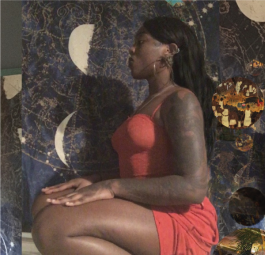
Artwork by Shaka Dendy
With every aspect of our daily lives being so disrupted and precarious right now, it can be difficult to cultivate meaningful rituals, routines, or even a sense of purpose. Finding ways to cope, no matter how big or small, are more important than ever.
The intent of this activity is to encourage a routine that slows down time, encourages visualization, and focuses on process rather than outcome. Like the sand mandalas of Tibetan Buddhist monks, or the seasonal cycles of plants, you will create and erase—paint and rinse—and, through this rinsing, you will create a new space for creation. Ultimately, you will create a one-of-a-kind artwork that is a reminder of this process.
En este momento, cuando cada aspecto de nuestras vidas cotidianas resulta tan alterado y precario, puede ser difícil cultivar rituales significativos, rutinas o, incluso, un sentido de propósito. Encontrar maneras de sobrellevar las situaciones, sean estas grandes o pequeñas, es más importante que nunca.
El objetivo de esta actividad es fomentar una rutina que haga más lento el tiempo, facilite la visualización y se concentre más en el proceso que en el resultado. Al igual que los mandalas de arena de los monjes del budismo tibetano, o los ciclos estacionales de las plantas, crearás y borrarás—pintarás y lavarás—y, al lavar, al diluir, crearás un nuevo espacio de creación. En definitiva, crearás una obra de arte inimitable que será un recordatorio de este proceso.
Materials/Materiales:
|
 |
|
Instructions:
* This will rinse away most of the painting, leaving traces of color and a new canvas for you to continue on. |
Instrucciones:
* Esto hará que se lave o se diluya la mayor parte de la pintura, dejando trazos de color y un nuevo tablero de lienzo para que puedas seguir. |
Shaka Dendy is a conceptual artist and musician living in Boston until he can move to the future.
Shaka Dendy es un artista conceptual y músico que vive en Boston hasta que pueda mudarse al futuro.
Artwork by Mintou B
Artwork by Ky B.
Artwork By Cici Marléne B.
Artwork by Ky B.
This activity is recommended for children ages 5 and up, and is a great activity to work on as a family.
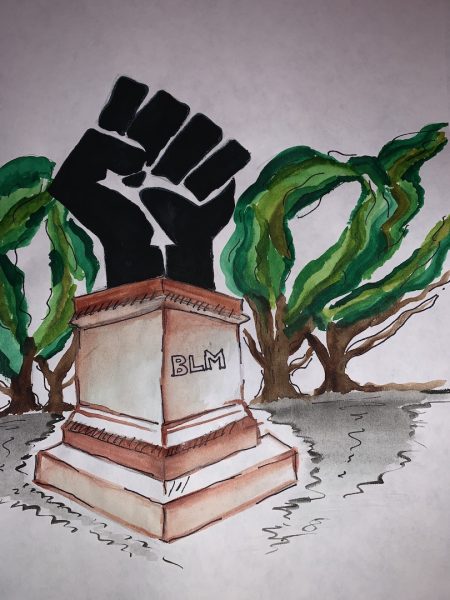
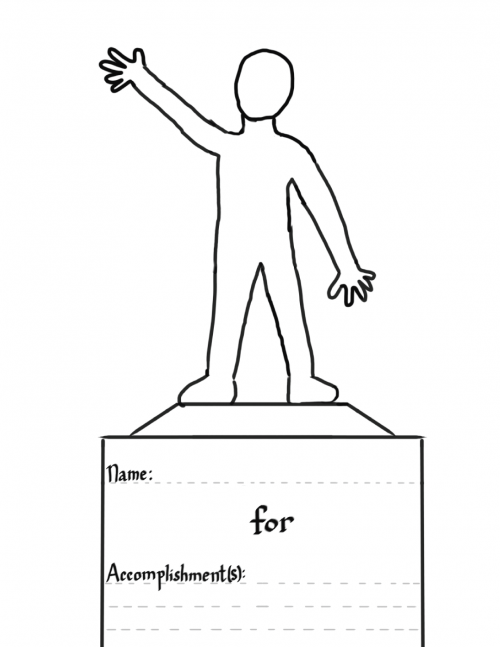
A public monument is a statue, building, or other structure that represents a special person or event. Are there examples of these in your community? Who and what do you want to see represented in monuments? Where should they exist? Dream and design your own monuments through these two activities designed for kids by teens.
Think about something that is really important to you. If you were to share it with the world, what would it look like? You can create something on paper or with found objects. See images in the banner above for some artwork examples we made to share with you!
Materials:
|
 |
Coloring sheet by TAC member Rosaylin B., Activity text written by TAC member Scania G.
Steps:
Using drawing utensils of your choice, fill in your name.
Imagine yourself 15-20 years in the future. What is something that you want to accomplish?
Draw your future self and accomplishment that you want to be remembered for.
|
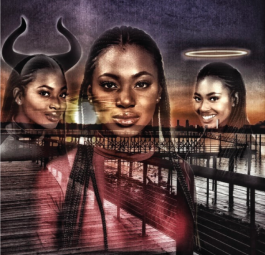
CICI MARLÉNE B. As a Black, lesbian, Haitian immigrant, I center marginalized beings within all that I create. My intention is to utilize my inner anguish and existential hubris in order to portray and represent celestial beings, such as myself, on the forefront of eternal life. |
|
|
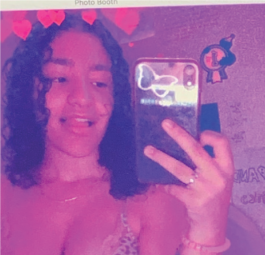
KY B. My name is Ky and I’m 19 years old. My way of self expression is multimedia art. I love to use the items we find unnecessary in this world and repurpose them into something worth looking at. I’m a writer: I write about my life and my point of view on the world, which I still have hope in. Moving to America from Tunisia at the age of 18 really gave me a different perspective on life and how truly beautiful it is. With my creations, I wish to show how the little things will always matter even if we choose to marginalize them. The world has potential yet we use it in the most destructive ways. I wish to show peace, equality and love through what I make. Through art, writing and activism, I find my hope. |
|
|
MINTOU B. My name is Mintou Barry and I’m 18 years old. I express myself and create art typically through photography, however I am interested in and open to learning more about digital art and graphic design. I care a lot about social justice issues and reform and I’m very passionate about obtaining equity for minorities. Through my art, I hope others will be inspired to express themselves freely through their own art. |
|
|
ROSAYLIN B. I’m Rosaylin and I’m 17 years old. I love to express myself through my makeup and general appearance. I’m currently learning how to create films and digital art. With my art, I hope to inspire others to seek out the best versions of themselves. |
|
|
SCANIA G. My name is Scania Garcia and I’m 16 years old. My eyes see the world with an unfocused lens and my mind is often fogged. Art has taught me to focus on the more beautiful things, even when I feel like there aren’t any. I have the chance to see the world and its beauty in its entirety: Unfiltered and whole. The fun thing about existing is that you have the opportunity to make your life your own. |
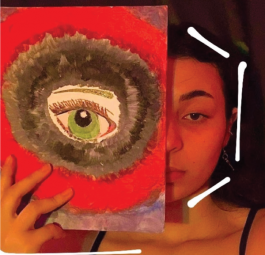
Artwork by Mithsuca Berry
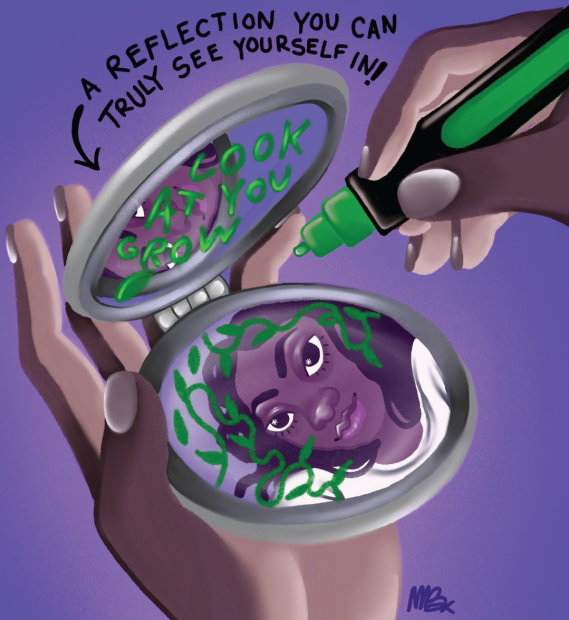
The associations around reflection or looking at oneself can be quite overwhelming. This activity seeks to transform that experience by decorating and thus altering the experience of looking into a mirror. Together we will reimagine what it means to really “see” yourself!
Las asociaciones que podemos tener con nuestra imagen pueden ser bastante abrumadoras. El objetivo de esta actividad es transformar esa experiencia al decorar y, en consecuencia, alterar la experiencia de mirarse al espejo. Juntos volveremos a imaginar lo que realmente significa “mirarse” a uno mismo.
Materials/Materiales:
Instructions:
Write your name on the outside or inside of the mirror.
Think about things that reflect you. Using the paint makers and/or stickers, draw and embellish your ideas on the mirror (I suggest inside for a little surprise when you open it.) Think abstract portrait!
Extra Challenge: Write your thoughts after the experience in a letter to yourself. Keep that letter folded within your mirror for later reading.
Instrucciones:
Desafío adicional: Escribe una carta para ti mismo con tus pensamientos después de la experiencia. Guarda esa carta doblada en el espejo para leerla más tarde.
To Mithsuca Berry, creativity goes beyond technicality and into a way of living. Based in Boston, Mithsuca uses the art of storytelling to bring healing and reimagining to their community.
Para Mithsuca Berry, la creatividad va más allá de lo técnico y es una forma de vivir. Con residencia en Boston, Mithsuca recurre al arte de la narración para aportar sanación y para volver a imaginar la imagen en su comunidad.
The Aztecs used a variety of wind and percussion instruments to make music, including rattles and different kinds of drums. For the Aztecs, dance and songs were ways of praying and meditating to be in harmony with nature, earth, and the universe. In their dances they represented the elements (Wind, Fire, Water, and Soil) and performed to the four cardinal points (North, South, West, and East) to request from Mother Earth the permission to live and work.
The symbol “Nahui Ollin” (pro — nounced as naw-wee-oh-leen) represents the day of the Aztec calendar associated with Xolotl. Xolotl is the god of shifting shapes, twins, and Venus, the Evening Star. Nahui means four, and Ollin means movement.
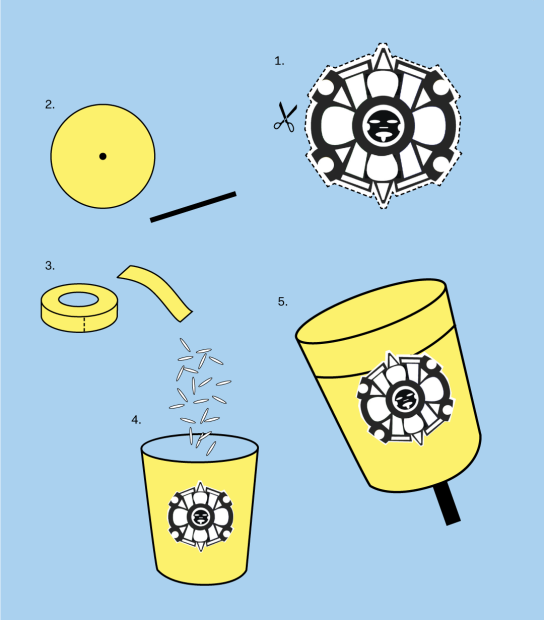
There are beautiful songs and poetry in Nahuatl, the language of the Aztec people and their descen — dants. Create your own Ayacachtli, or Aztec rattle, and play and sing along to “Huey Tonantiz,” which means Great Mother Earth.
_____________________________________________________________________
Los aztecas usaban una variedad de instrumentos de viento y de percusión para crear música, como sonajeros y diferentes tipos de tambores. Para los aztecas, la danza y las canciones eran maneras de rezar y meditar para estar en armonía con la naturaleza, la tierra y el univer — so. En sus danzas, representaban los elementos (aire, fuego, agua y tierra) y bailaban en dirección a los cuatro puntos cardinales (Norte, Sur, Este y Oeste) para pedirle per — miso a la Madre Tierra para vivir y trabajar.
El símbolo de “Nahui Ollin” (se pronuncia na-hui-o-lin) representa el día de Xolotl en el calendario azteca. Xolotl es el dios de las formas cambiantes, los mellizos y Venus, la estrella de la tarde. Nahui significa cuatro, y Ollin significa movimiento.
En el idioma de los aztecas y sus descendientes, el nahuatl, existen bellas canciones y poemas. Crea tu propio ayacachtli, o sonajero azteca, para tocar y cantar “Huey Tonantiz,” que significa la Gran Madre Tierra.
Materials / Materiales:
Instructions / Instrucciones:
|
1. Decorate your cup. Color and cut out the image of the “Nahui Ollin” symbol. Glue it on to your cup. Add your own drawings and symbols. Be as creative as you like! 2. Very carefully (and with adult supervision), create a small hole in the bottom of the cup and insert the stick into the cup to attach it. 3. Use the masking tape to wrap the stick and secure it to the cup. 4. Fill your cup with rice. 5. Close the cup with the lid and seal it with masking tape. Note: The sound will be louder with rice. It will sound different if you use beans. You can also try plastic beads or other similar mate — rials. Explore the sounds and beats of nature and try to imitate them with your Ayacachtli.
|
1. Decora el vaso. Colorea y recorta la ima — gen del símbolo de “Nahui Ollin”. Pégalo al vaso. Agrega tus propios dibujos y símbolos. ¡Sé todo lo creativo que quieras! 2. Con mucho cuidado (y con la supervisión de una persona adulta), crea un pequeño orificio en el vaso e inserta el palillo en él para unirlo. 3. Forra el palillo con la cinta adhesiva y sujétalo al vaso. 4. Llena el vaso con arroz. 5. Cierra el vaso con la tapa y séllalo con cinta adhesiva. Nota: El sonido será más fuerte si usas arroz. Sonará diferente si empleas frijoles. Tam — bién puedes probar con cuentas de plástico y otros materiales parecidos. Investiga los sonidos y los ritmos de la naturaleza e intenta imitarlos con tu ayacachtli. |
|
IN ENGLISH “GREAT MOTHER EARTH” Great Mother Earth Translated by Veronica Robles
|
“HUEY TONANTZIN” ¡Huey Tonantzin, Tonantzin, ¡Huey Tonantzin, Tonantzin, Ipalnemohuani Noyolo Paqui Ipalnemohuani Noyolo Paqui EN ESPAÑOL “GRANDIOSA MADRE TIERRA” Grandiosa Madre Tierra, Traducido por Veronica Robles |
This activity was developed by Veronica Robles, a Mariachi singer, musician, and folkloric dancer. Robles has become a cultural icon for Latinos in Boston. She has effectively utilized the power of arts and culture to bring the community together by raising awareness on the importance of diversity. She offers in-person and virtual educational programs for K-12 students in schools and cultural organizations.
Veronica Robles es una cantante, música y bailarina folklórica mariachi que se ha convertido en un referente cultural para los latinos de Boston. Ha recurrido de manera eficaz al poder del arte y la cultura para reunir a la comunidad al crear conciencia sobre la importancia de la diversidad. Ofrece programas presenciales y virtuales para estudiantes de primaria y secundaria en escuelas y organizaciones culturales.

This activity is adaptable for beginners to experts, ideally ages 5 and up. Younger artists may need help making tape loops. Great for individuals, groups, and families to work on together at home.
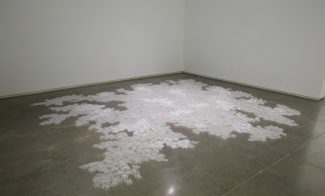
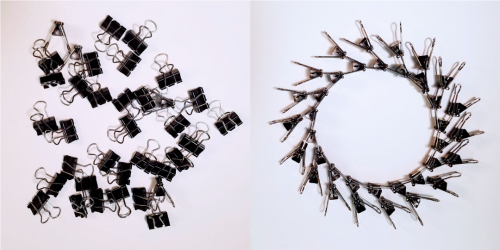
Inspired by Tara Donovan’s sculpture Nebulous made with Scotch tape, we invite you to play with everyday materials which are often found at home and not typically thought of as art supplies. By sticking, stacking, clipping, and positioning mundane objects in new ways, we can transform objects into exciting and unexpected sculptures. Experiment with building temporary sculptures using loops of tape, binder clips, or whatever else you have access to and have permission to use for artmaking. Be creative and share with the world what you make!
You will need:
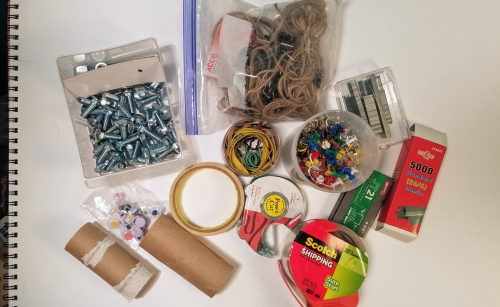
Everyday objects in multiples. Some ideas:
Check out the video demo for tips and a cat cameo!
Check out the video demo for tips and a cat cameo!
Clip one binder clip onto one silver wing of another binder clip.
This lesson was developed by Brooke Scibelli, Family and Art Lab Programs Coordinator.