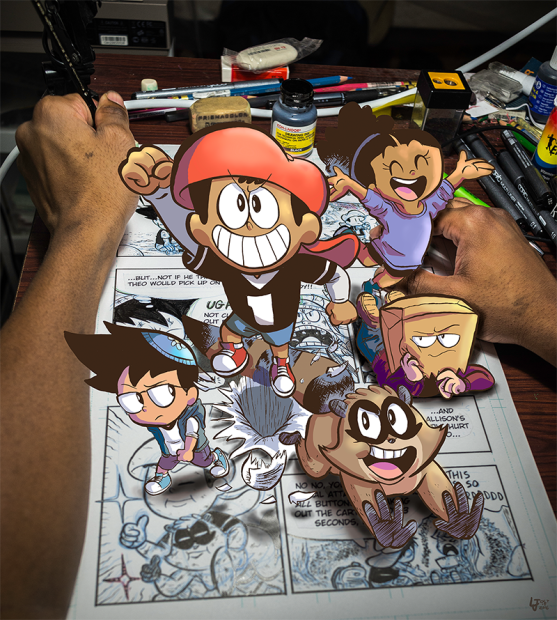
Illustration by LJ-Baptiste
Illustration by LJ-Baptiste
|
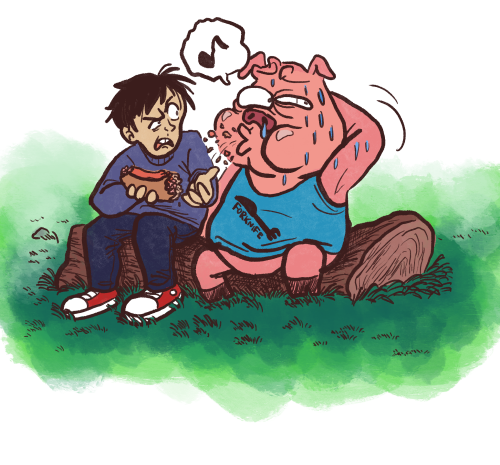
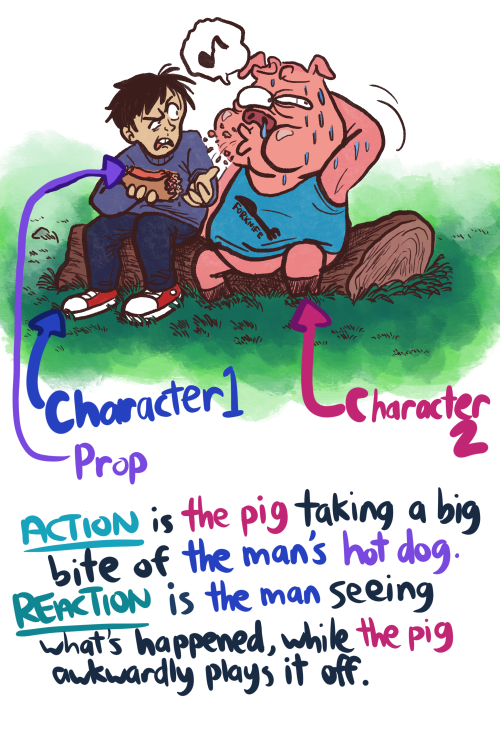
Using the attached image as an example, you’ll devise a comic strip that has a full beginning, middle, and end conveyed in one panel! This comic can be wordless or can contain words if desired, but it must contain at least two characters, a prop, an action, and a reaction within the singular panel. |
A partir de la imagen adjunta, concebirás una historieta con comienzo, nudo y desenlace, ¡presentada en una única viñeta! La historieta puede ser muda o contener palabras si lo deseas, pero debe incluir al menos dos personajes, un objeto, una acción y una reacción dentro de la viñeta. |
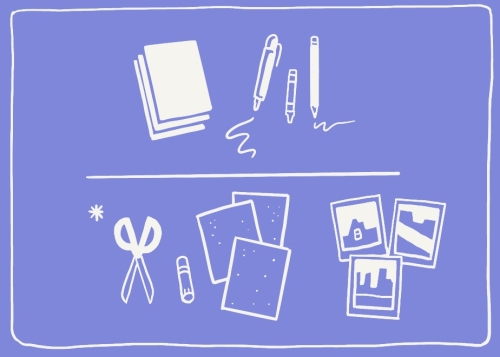
Materials/Materiales:
Instructions / Instrucciones:
|
1. On a scrap piece of paper, sketch out a variety of different characters as a warm up. These could be humans, aliens, animals, monsters, or any combination. 2. As you draw, focus on making your characters take part in an action or activity of some kind. An example would be playing a video game, blowing a huge gum bubble, pulling a prank, drinking a giant cup of soda, or any other thing that comes to mind! 3. Pick out at least two of the characters you’ve created, and draw out a one-panel comic strip featuring at least two characters, a prop, an action, and reaction. As you think of the action, develop a reaction that can be unexpected and take you by surprise. The reaction can be a character’s body language or expression or even the face they make at what’s happening around them. 4. If desired, this one-panel strip can be expanded upon for a larger comic story, or colored, inked, and finalized as-is! |
1. En un papel borrador, realiza bocetos de una variedad de diferentes personajes, como precalentamiento. Pueden ser seres humanos, extraterrestres, animales, monstruos o cualquier combinación. 2. A medida que dibujas, céntrate en hacer que tus personajes participen en algún tipo de acción o actividad. Por ejemplo, pueden estar jugando un videojuego, haciendo un globo enorme con goma de mascar, haciendo una broma, tomando un vaso gigante de refresco, ¡o cualquier otra cosa que se te ocurra! 3. Escoge al menos dos de los personajes que has creado y dibuja una historieta de una viñeta que contenga al menos dos personajes, un objeto, una acción y una reacción. Al pensar en la acción, desarrolla una reacción que sea inesperada y te tome por sorpresa. La reacción puede expresarse a partir del lenguaje corporal de un personaje, una expresión, o incluso el gesto que hacen a lo que está sucediendo a su alrededor. 4. Si lo deseas, puedes expandir esta viñeta en una historieta más larga, o colorearla, entintarla y terminarla como está. |
Artist Bio / Biografía del Artista:
Photo by Sherline Heriveaux.
|
LJ-Baptiste is an art educator and cartoonist from Boston. He is best known for his ongoing comic book series COMIXSCAPE, which features the adventures of a bright-eyed, perpetually preteen boy and his raccoon sidekick. Whether it’s work in animation, graphic apparel designs, or COMIXSCAPE, LJ’s art can be described as distinctive, masterful, and captivating. |
LJ-Baptiste es un profesor de arte e historietista de Boston. Es reconocido por su historieta en serie COMIXSCAPE, que sigue las aventuras de un eterno preadolescente muy astuto y su amigo mapache. El arte de LJ, ya sea de animación, diseño gráfico para indumentaria o en COMIXSCAPE, puede describirse como personal, magistral y cautivante. |
|
Share your artwork on social media with #ICAartlab |
Comparte tu obra de arte en las redes sociales con la etiqueta #ICAartlab |
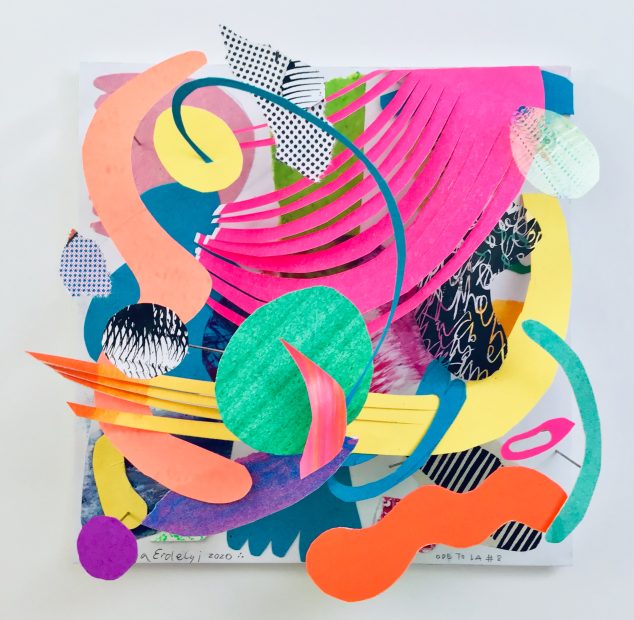
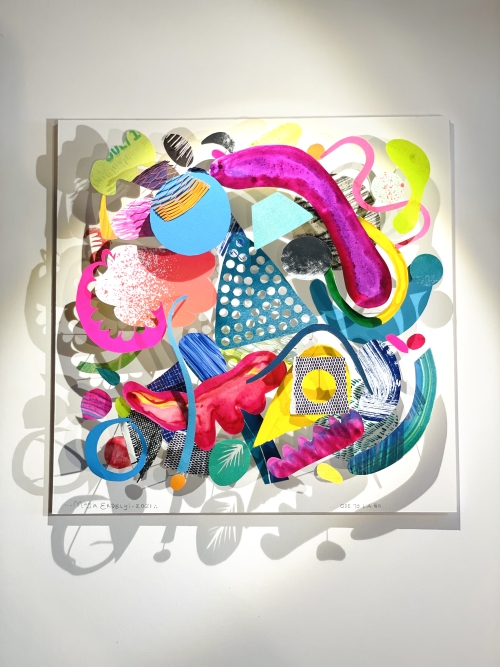
Artwork by Maya Erdelyi.
|
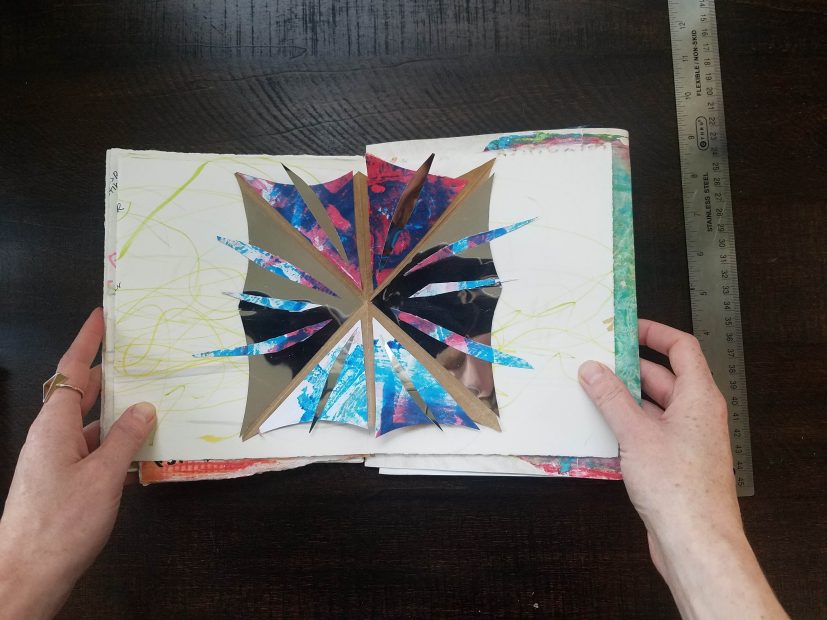
Explore color, shape and shadow by creating your own three-dimensional paper collage. Bend, twist, cut, weave and glue shapes from a variety of paper sources such as everyday magazines, colored paper, old books (like the ones you can find in free libraries on the street), or painted paper. Create a fun and wild collage that twists and turns and creates surprising shadows. Use complementary colors to make the colors pop and activate each other (Blue/Orange, Yellow/Purple, Red/Green). See what kind of paper engineering you can think of to get a three-dimensional feel. For inspiration, you can listen to your favorite song and make an abstract drawing based on the music. Work from this drawing as your guide for your collage. |
Explora el color, la forma y la sombra al crear tu propio collage de papel tridimensional. Pliega, tuerce, entrelaza y pega formas de una variedad de clases de papeles, como revistas, papel de color, libros viejos (como los que puedes encontrar en las bibliotecas gratuitas en la calle) o papel pintado. Crea un collage lleno de diversión y locura, que gire y cree sombras sorprendentes. Usa colores complementarios para hacer que estos resalten y para que se activen entre sí (azul/naranja, amarillo/violeta, rojo/verde). Piensa en qué clase de papel se te ocurre usar para crear una sensación tridimensional. Como inspiración, puedes escuchar tu canción favorita y crear un dibujo abstracto basado en la música. Trabaja a partir de este dibujo para crear tu collage. |
Materials/Materiales:

Instructions / Instrucciones:
|
1. Using your scissors, cut out different images, textures or colors from magazines, old books and any other cool paper you might have around your house. Old encyclopedias or even National Geographic magazines are fun to use. Optional: If you have paint, make some textures using an old toothbrush or comb with the paint on the paper. 2. Lay out all your different paper pieces (think of this as your paper palette—the way a painter would lay out colors) and start drawing shapes with a pencil on the back of the paper. 3. Cut shapes into lots of different sizes. Try to make some that are long curling shapes, some smaller geometric shapes, and some wiggly ones so you have a nice variety. 4. Using small pieces of foam core or thin pieces of card stock, make a paper stem(s). Glue these to the back of your paper shapes to create depth. This will make shadows and interesting layers to look at. 5. Create your collage by gluing your shapes and pieces onto your “canvas.” “activate” each other—either by their shapes, or by the patterns, textures and colors interacting. Think about the whole composition of the collage. If you’re having fun, you’re doing it right—make something that delights you! Finish gluing your pieces down and you’re done! Take a picture and share it with friends and family. |
1. Con las tijeras, recorta diferentes imágenes, texturas o colores de revistas, libros viejos y cualquier otro papel divertido que puedas tener en casa. Desde enciclopedias viejas hasta los ejemplares de National Geographic, todo es divertido para usar. Opcional: si tienes pintura, crea algunas texturas con un cepillo de dientes o peine con la pintura en el papel. 2. Dispón todos los pedazos de papel que tengas (imagina que son una paleta de papel, como dispondría un pintor de los colores) y comienza a dibujar formas con un lápiz en el dorso del papel. 3. Recorta formas de muchos tamaños diferentes. Intenta crear algunas con formas largas y curvas, algunas formas geométricas más pequeñas y algunas formas caprichosas para tener una buena variedad. 4. Con pequeños trozos de cartón pluma o con piezas de cartón delgadas, crea uno o varios tallos de papel. Pégalos en el dorso de tus formas de papel para crear profundidad. Esto creará sombras y capas interesantes para mirar. 5. Crea tu collage pegando las formas y las piezas en tu «lienzo». Deja que se «activen» entre sí por su interacción, ya sea de formas, motivos, texturas o coloress. Piensa en la composición completa del collage. Si te estás divirtiendo, lo estás haciendo bien, ¡haz algo que te encante! Por último, pega las piezas y habrás terminado. Toma una fotografía y compártela con tus amigos y familia. |
Artist Bios / Biografía del Artista:
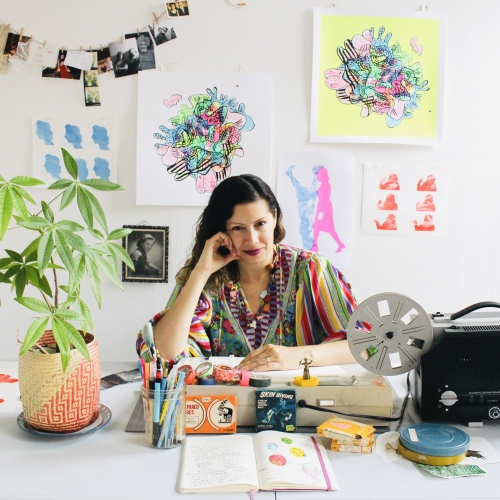
Photo by Allison Cekala.
|
Maya Erdelyi is an award-winning animator, artist and educator. She creates intricate hand-made animations, collages and installations inspired by imaginary worlds, music, memories and dreams. Ingredients in her work include: printmaking, painting, puppetry, stop-motion, bold colors, patterns and found paper textures. |
Maya Erdelyi es una artista, educadora y animadora que ha recibido algunos premios. Crea elaboradas animaciones hechas a mano, collages e instalaciones inspiradas en mundos imaginarios, música, recuerdos y sueños. Los elementos de su obra incluyen grabado, pintura, títeres, stop-motion (animación en volumen), colores vivos, motivos y texturas de papeles encontrados. |
|
Share your artwork on social media with #ICAartlab |
Comparte tu obra de arte en las redes sociales con la etiqueta #ICAartlab |
Inspired by Deana Lawson’s interest in portals and future-building, create a portal to your dream future inside a pop-up card. Craft a magical portal with reflective sticky paper, and let your true self shine through. Open your portal each time you need a reminder of where you’re going and who you want to be.
1. Open the greeting card and lay it flat on a work surface. Using drawing materials, decorate the inside of the card with personal reflections and inspiring messages or drawings. Fill up the entire inside of the card top to bottom, above and below the fold. This will be the background to your portal. Consider these questions for inspiration:
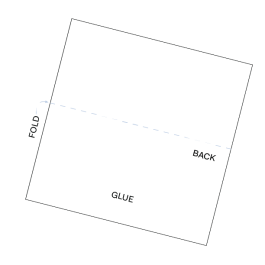
2. On the pop-up template, fold carefully along the dashed fold lines. Check both sides of the template for fold lines. Check out the Folding Tips! for visual instructions.
3. Apply glue to the folded pop-up template only where it says “GLUE”. Place the pop-up template into the inner fold of the card. Press and hold the glued areas for 10 seconds. Allow to dry. Once dried, slowly open and close your card to ensure the pop-up is folded how you would like.
4. Cut reflective paper into shapes that will go inside your pop-up card. Once cut into pieces, remove the white backing to reveal the sticky side. Open your pop-up card and stick your pieces of reflective paper onto the pop-up template however you would like. Avoid sticking reflective paper over the fold lines so that your card will fold and pop-up easily. ;Lastly, remove the blue protective film to reveal the shiny side of the reflective paper.
5. Close your card. Decorate the front and back of the card. Consider a short message or image for the front of the card that will make you feel joyful. Include your name and date on the back of the card.
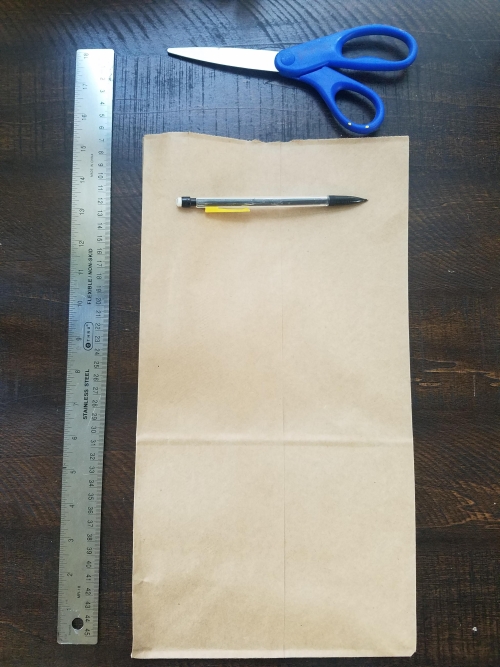
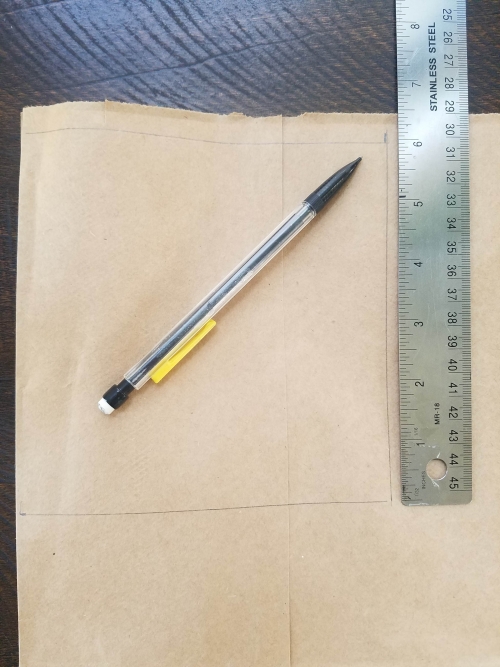
Download and print the pop-up template. Don’t have a printer? Make your own template with a paper bag! Measure and cut a 6” x 6” square piece of paper (could be from a brown paper bag like pictured). With a pencil, lightly label one side “BACK.”
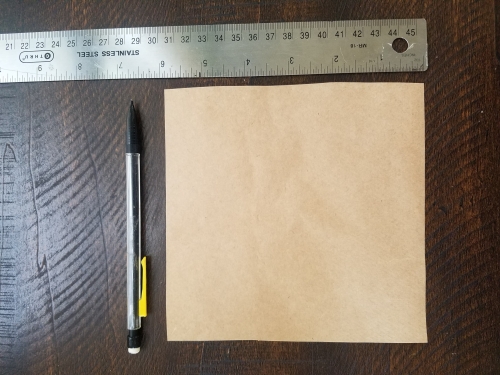
Whether you printed or made your own template, here’s how to fold your pop-up template: Start by laying the square flat on your work surface with the “BACK” side facing up. Fold the square in half so the top edge meets the bottom edge. Fold your crease firmly.
Open the square. Flip it over so the “BACK” side is against the work surface. Fold diagonally so the top left corner meets the bottom right corner. Open the square and fold diagonally in the opposite direction, so the top right corner meets the bottom left corner. Fold your creases firmly.
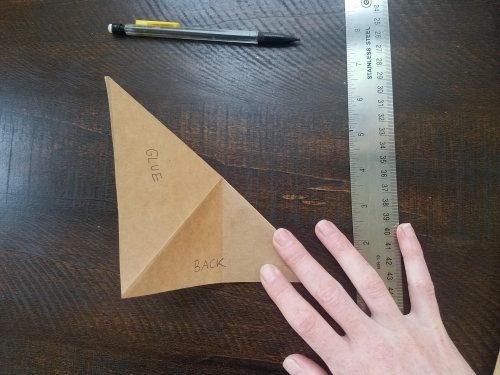

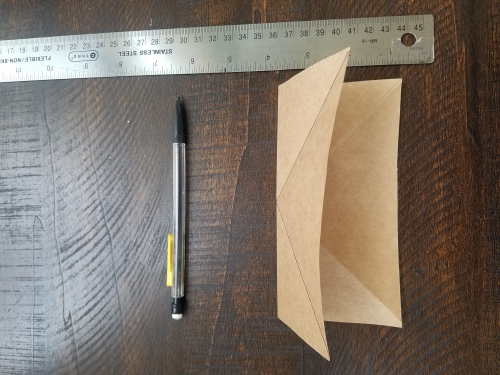
Open the square. Bring the middle of each outside edge up and towards each other to create a folded triangle. This will create the pop-up effect in your card.
This activity was designed by Brooke Scibelli, Family & Art Lab Programs Coordinator.

|
Think about your favorite or most meaningful places and spaces. Are there places in your home, neighborhood, or city that you enjoy visiting? What places bring you joy, comfort, rest, or curiosity? Are there spaces in your life that make you smile or bring back memories? This activity asks you to build a deck of cards honoring these places, spaces, and memories. Once you have your deck made, you’ll be able to revisit them. Use them in conversation, for planned meet-ups or to inspire spontaneous adventures. Create, collect, share, or trade them with your future self, a family member, or a friend. |
Piensa en tus lugares y espacios favoritos o que te resulten más significa-tivos. ¿Hay lugares en tu casa, tu barrio o ciudad que te guste visitar? ¿Qué lugares te provocan alegría, seguridad, descanso o curiosidad? ¿Hay espacios en tu vida que te hacen sonreír o te traen recuerdos? Esta actividad te propone crear un mazo de cartas como homenaje a esos lugares, espacios y recuerdos. Con este mazo, podrás volver a visitarlos. Usa las cartas en conversaciones, para reuniones programadas o para inspirar aventuras espontáneas. Puedes crearlas, coleccionarlas, compartirlas o intercambiarlas contigo mismo en el futuro, con un familiar o un amigo. |
Materials/Materiales:
Instructions / Instrucciones:
|
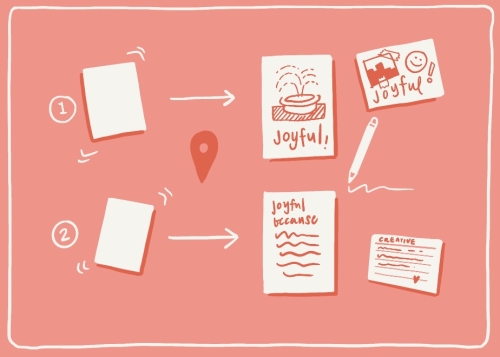
1. On side 1 of your index card: a. Label your card with a descriptive word or prompt of your choosing. (See suggestions for inspiration!) b. Visualize the space/place that comes to mind when you think of that word. Feel free to draw, collage, or print out and paste an image. 2. On side 2 of your index card: a. Describe your chosen location and share a memory of your time there. Consider why you feel like it embodies the descriptive word or prompt. 3. Continue to add to and build a deck of your memorable and meaningful spaces and places. 4. Revisit them through the deck or in real life! Share with others. Here’s a list of descriptive words or prompts to get you started. Feel free to make up your own! Visualize an existing space or place that feels:
|
1. En una cara de tu ficha: a. Etiqueta la carta con un término o apunte descriptivo. (¡Mira las sugerencias para inspirarte!) b. Visualiza el lugar o espacio que asocias con ese término. Siéntete libre de dibujar, hacer un collage o imprimir y pegar una imagen. 2. En la otra cara de tu ficha: a. Describe el lugar elegido y comparte un recuerdo del tiempo que pasaste allí. Considera por qué sientes que ese lugar encarna el término descriptivo elegido. 3. Continúa añadiendo fichas para formar un mazo con los lugares o espacios que son especiales para ti. 4. ¡Vuelve a ellos por medio de las cartas o en persona! Compártelos con otras personas. A continuación, encontrarás una lista de términos descriptivos que puedes usar para inspirarte. O elige cualquier otro que te guste. Imagina un lugar o espacio real que te haga sentir:
|
Artist Bios / Biografía del Artista:
|
Sabrina Dorsainvil (sab — ee — dee) is a first generation Haitian American artist, designer, and illustrator. As an artist, they often explore identity, intersectionality, queerness, difference, and collective emotion. They use reflective practices of storytelling, visual design, and public art as a way to celebrate our shared humanity. |
Sabrina Dorsainvil (sab — ee — dee), de nacionalidad haitiana estadounidense de primera generación, se dedica al arte, al diseño y la ilustración. Como artista, a menudo explora la identidad, la intersec-cionalidad, lo queer y la emoción colectiva. Además, recurre a prácticas reflexivas como la narración, el diseño visual y el arte público para celebrar nuestra humanidad compartida. |
|
Share your artwork on social media with #ICAartlab |
Comparte tu obra de arte en las redes sociales con la etiqueta #ICAartlab |
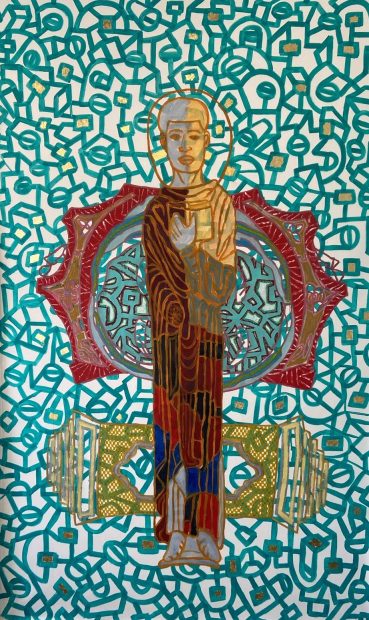
Marlon Forrester, StTrayvonFloyd23, 2021. Acrylic, gold leaf on canvas, 97 × 61 inches (246.38 × 154.94 cm). Courtesy the artist. © Marlon Forrester
|
Explore the images in Marlon Forrester’s painting StTrayvonFloyd23, part of If Black Saints Could Fly, featured in the 2021 James and Audrey Foster Prize exhibition at the ICA, by combining figurative and architectural structures through tracing, drawing, and coloring to create your own interpretation. After completing your artwork, visit the ICA to view Forrester’s vivid and detailed artwork in person. Painter Marlon Forrester celebrates how race, identity, and religion affect the Black male body through the sport of basketball. His paintings consider iconoclasts (someone who questions and refuses to conform to established beliefs), patterns from basketball courts, architectural structures related to religious buildings, and numbers that function as symbols of transformation. Each figure functions as a central axis point in his paintings and is framed by bold gestural lines that bend and weave through the background. He uses pointillist marks that create depth while optically mixing colors that bring a pulsating energy and life to the paintings. |
Explora las imágenes de la pintura de Marlon Forrester StTrayvonFloyd23, parte de If Black Saints Could Fly (Si los santos negros pudiesen volar), que se exhibió en ocasión del Premio James y Audrey Foster 2021 en el ICA, al combinar estructuras figurativas y arquitectónicas a través de calcar, dibujar y colorear para crear tu propia interpretación. Después de completar tu obra de arte, visita el ICA para ver en persona esta obra de arte vívida y detallada de Forrester. El pintor Marlon Forrester rinde un homenaje a cómo la raza, la identidad y la religión afectan el cuerpo masculino negro a través del deporte del basquetbol. En sus pinturas, considera a los iconoclastas (quienes cuestionan las creencias establecidas y no se conforman con ellas), los motivos de las canchas de basquetbol, las estructuras arquitectónicas relacionadas con los edificios religiosos, y números que funcionan como símbolos de transformación. Cada personaje funciona como el punto de un eje central en sus pinturas, y lo enmarcan fuertes líneas gestuales que se entrelazan y doblan a lo largo del fondo. Aplica marcas puntillistas que crean profundidad a la vez que mezcla los colores creando un efecto óptico que aporta palpitante energía y vida a las pinturas. |
Materials/Materiales:
Instructions / Instrucciones:
|
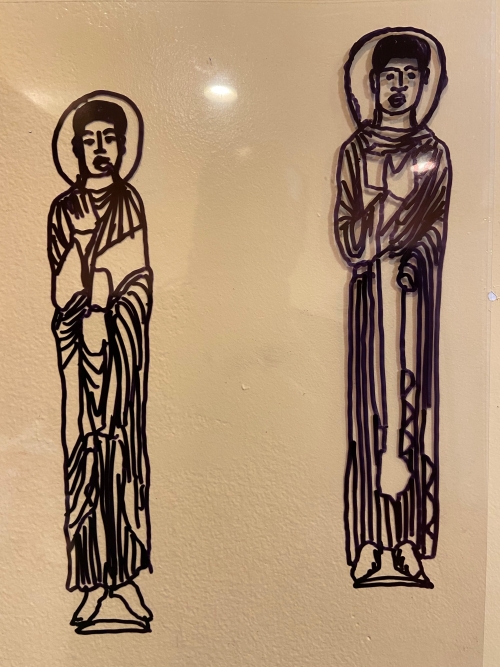
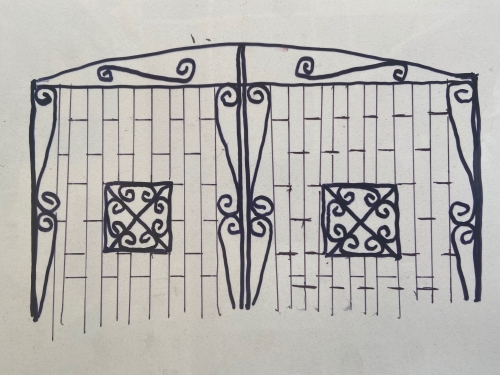
1. Choose or draw a human figure. a. Either cut and glue the figure onto a piece of paper or trace the figure using the tracing paper. 2. Select one of the patterns of an architectural design provided by the artist. Option 1: Cut around the lines of the architectural design to create your own stencil. Option 2: Trace elements of the pattern using the tracing paper. 3. Draw the stencil design or trace on and around your figure, thinking about balance and symmetry. 4. Add color with colored pencils and/or markers. |
1. Elige o dibuja una figura humana. a. Corta y pega la figura en una hoja de papel o usa el papel de calcar para copiarla. 2. Selecciona uno de los motivos de un diseño arquitectónico que proporciona el artista. Opción 1: Recorta siguiendo las líneas del diseño arquitectónico para crear tu propio esténcil. Opción 2: Copia elementos del diseño con el papel de calcar. 3. Dibuja el diseño del esténcil o cálcalo sobre y alrededor de la figura, teniendo en cuenta el equilibrio y la simetría. 4. Añade color con lápices de colores y/o marcadores. |
Artist Bios / Biografía del Artista:
|
Marlon Forrester, born in Guyana, South America, is an artist and art educator raised in Boston. Forrester is a graduate of the School of the Museum of Fine Arts (B.A., 2008) and Yale School of Art (M.F.A., 2010). He is a resident artist with the African-American Masters Artist Residency Program (AAMARP) and an adjunct to the Department of African-American Studies in association with Northeastern University. |
Marlon Forrester, nació en Guyana, América del Sur, y es un artista y educador de arte que creció en Boston. Forrester se graduó en la Escuela del Museo de Bellas Artes (Licenciatura en Bellas Artes, 2008) y en la Escuela de Arte de la Universidad de Yale (Máster en Bellas Artes, 2010). Es artista residente del African-American Masters Artist Residency Program (AAMARP) adjunto al Departamento de Estudios Afroamericanos en asociación con ;Northeastern University. |
|
Share your artwork on social media with #ICAartlab, #MarlonForrester, #StTrayvonFloyd23 |
Comparte tu obra de arte en las redes sociales con #ICAartlab, #MarlonForrester, #StTrayvonFloyd23 |

| We think of history as events written in textbooks, but most often our personal histories are written in the people and objects that surround us. These objects portray what we ourselves find important, the things we interact with every day, that we can’t live without. By making note of these objects through art, we preserve and exhibit their importance in our lives. |
Cuando pensamos en la historia, recordamos eventos descritos en libros de texto, pero con frecuencia nuestras historias personales están escritas en las personas y los objetos que nos rodean. Estos objetos retratan lo que nos parece importante, aquellas cosas con las que interactuamos a diario y sin las cuales no podemos vivir. Al poner en relieve estos objetos a través del arte, protegemos y mostramos su importancia en nuestras vidas. |
Materials/Materiales:
Instructions / Instrucciones:
|
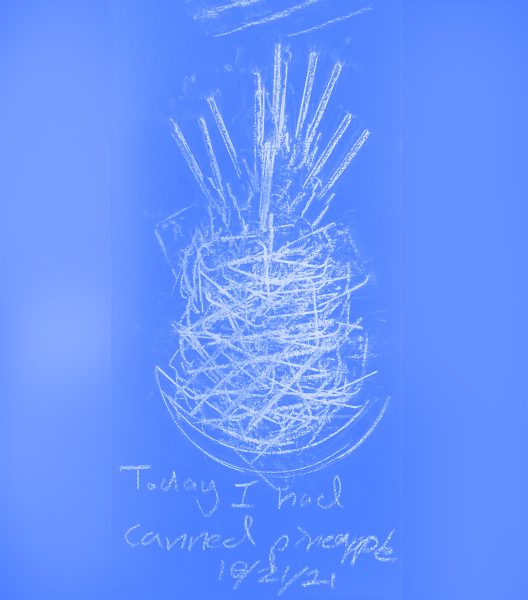
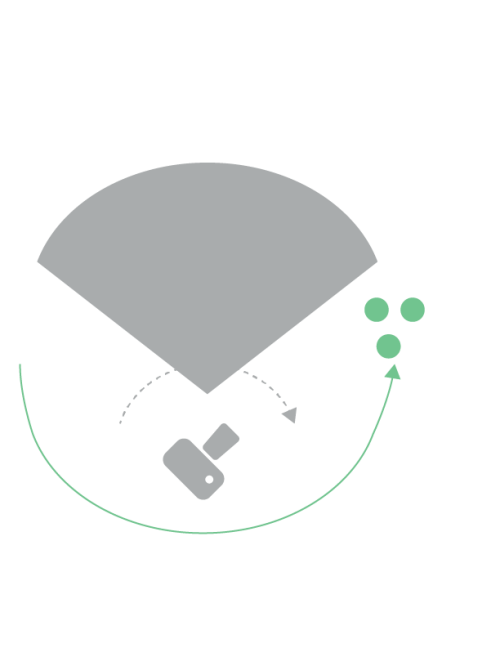
Each day for 30 days, make a rubbing or a drawing of an object that was important to you that day. Write down the date. To make a rubbing, simply place your paper on top of a hard and flat object. Using the side of your crayon, rub lightly back and forth until the shape of the image appears. Remember that even the most common objects are important to our personal histories, like the things in our pockets or the ground that we walk on. Almost everything has a pattern and a texture. With practice, you can even combine textures and objects you find to make pictures! Here, you can see that I used the key to my front door and a heating vent to represent the canned pineapple I ate as a snack. Of course, your rubbings don’t have to actually look like something. Simple textures can be powerful triggers for your memory. When you’ve run out of paper, place all the sheets together in a grid on your floor. Looking at them together, see what you can remember about the history you’ve made each day! |
Durante 30 días, crea a diario un frottage o un dibujo de un objeto que fue importante para ti ese día. Anota la fecha. Para crear un frottage, tan solo coloca el papel sobre un objeto rígido y plano. Con un lado del crayón, frota ligeramente hacia atrás y adelante hasta que aparezca la forma de la imagen. Recuerda que hasta los objetos más comunes son importantes en nuestras historias personales, como las cosas que tenemos en los bolsillos o el suelo que pisamos al caminar. Casi todo tiene un motivo y una textura. Con la práctica, incluso puedes combinar texturas y objetos que encuentres para crear imágenes. Como puedes ver, aquí usé la llave de la puerta principal y una rejilla de ventilación para representar la piña en lata que comí como refrigerio. Por supuesto que no es necesario que tus frottages representen un objeto. Las texturas simples tienen el poder de desencadenar recuerdos. Cuando te quedes sin papel, reúne todas las hojas en el suelo para formar una red. Al verlas juntas, nota qué recuerdas acerca de la historia que creaste cada día. |
Artist Bios / Biografía del Artista:
|
Born and raised in Boston, Eben Haines makes work that investigates the life of objects and the constructed nature of history. Using a variety of mediums including painting, sculpture, and drawings, recent works consider the inequity of existing historical systems that maintain housing insecurity. |
Eben Haines nació y creció en Boston, y crea obras en las que investiga la vida de los objetos y la naturaleza construida de la historia. Mediante una variedad de medios, entre ellos, la pintura, la escultura y el dibujo, sus obras recientes plantean la desigualdad de los sistemas históricos existentes que sustentan la precariedad de la vivienda. |
|
Share your artwork on social media with #ICAartlab |
Comparte tu experiencia en redes sociales con #ICAartlab |
If you’re a storyteller or an artist, it’s easier than you think to bring your ideas to life with stop motion. Stop motion animation is a movie-making technique that brings objects to life on screen. This is done by moving the object in small amounts while taking a picture after each movement. When all the pictures are played in order, it shows movement. With a free and easy-to-use app, materials from around the house, and some patience and creativity, you can create your very own stop motion movie!
1. Brainstorm and plan out your stop motion movie. Stop motion can be made out of anything, so the materials are up to you. What art supplies do you like to use? What toys do you like to play with? Stop motion is made by moving real life objects, so those objects are up to you. What will they do? What is the story? It’s a good idea to know ahead of time what your movie will be about.
2. Gather your materials. Will you be animating your favorite stuffed animal? What about animating pencil drawings on paper? Whatever you will be working with, gather your supplies and be ready to animate.
3. Install the Stop Motion Studio app on your touch screen device of choice. This app is available on all touch screen devices and is free to download and use. Make sure that the camera within the app is working and that nothing is blocking it.
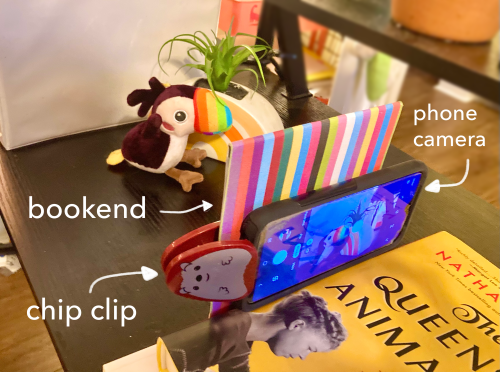
4. Set up your device with the camera facing out and towards the items that you want to animate. It’s a good idea to prop up your device with either a built-in stand on the device’s protective case, or with books or any other sturdy object that will keep it from shaking or falling over.
5. Decide where your objects will be within the camera. Make sure that you can see everything clearly and that the camera is pointed right at whatever’s most important.
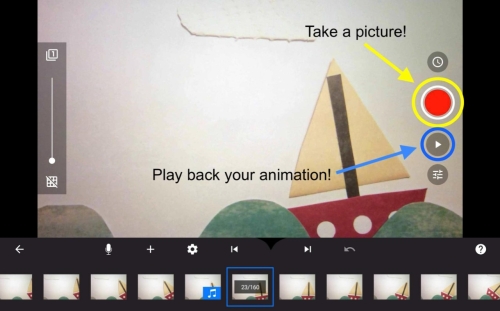
6. Look at the controls within the Stop Motion Studio app. The big red button will take a picture. It’s a good idea to take a test picture to make sure the camera is working.
7. Stop motion is a movie-making method that uses many, many pictures to create movement. Start by taking one picture, whether it’s a drawing, a toy, or a found object. That’s your first frame!

8. Move your object slightly, or make a small change in what the camera sees. Stop motion takes time, so move slowly! The more pictures you take, the slower your movement will be. The fewer pictures you take, the faster it will be.
9. Continue moving your object slightly and taking a picture after each movement. The triangle button below your big red button will play back what you have so far.
10. Keep taking pictures, and see how far you can go. Can you make multiple seconds of animation? Can you tell a whole story?
Ariel Grubb is an animator and artist that lives and works in Boston, Massachusetts. Ariel teaches at Lesley University in the Animation and Motion Media Program, animates licensed characters for animated Candyrific Fanimation toys, and works as a freelance stop motion and experimental animator. Ariel is inspired by animals, nature, and fantasy worlds.
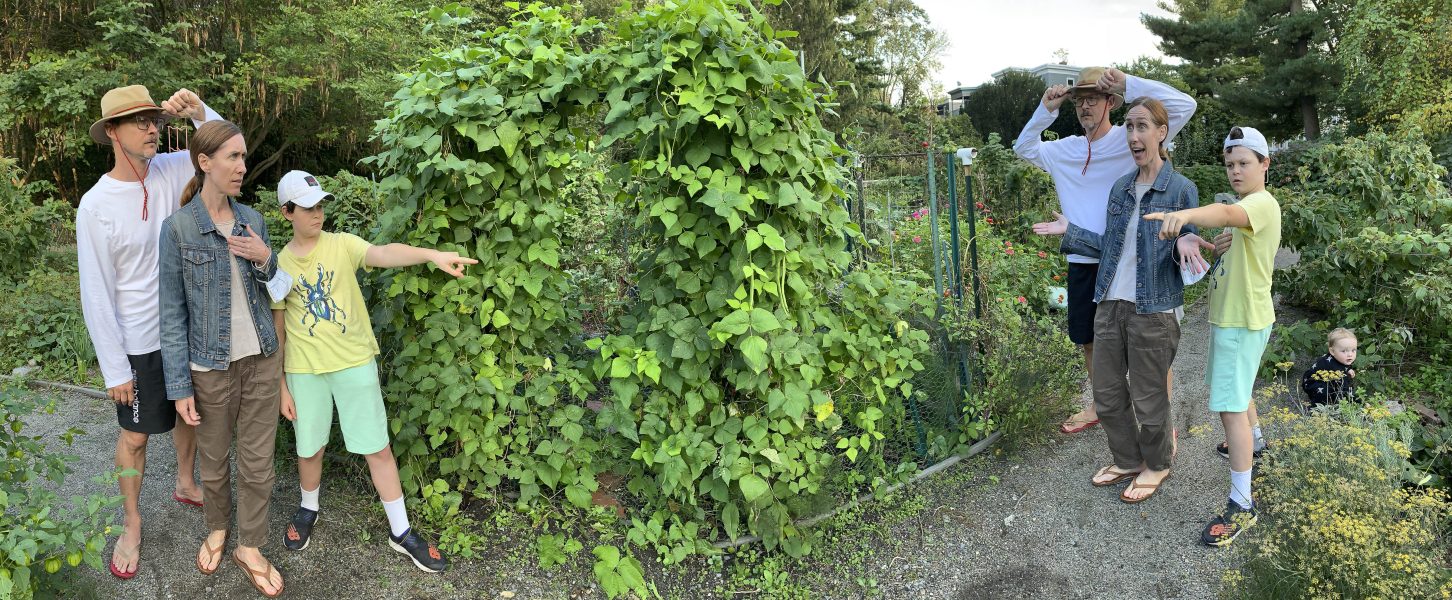
Photo by Gretjen Helene Photography.
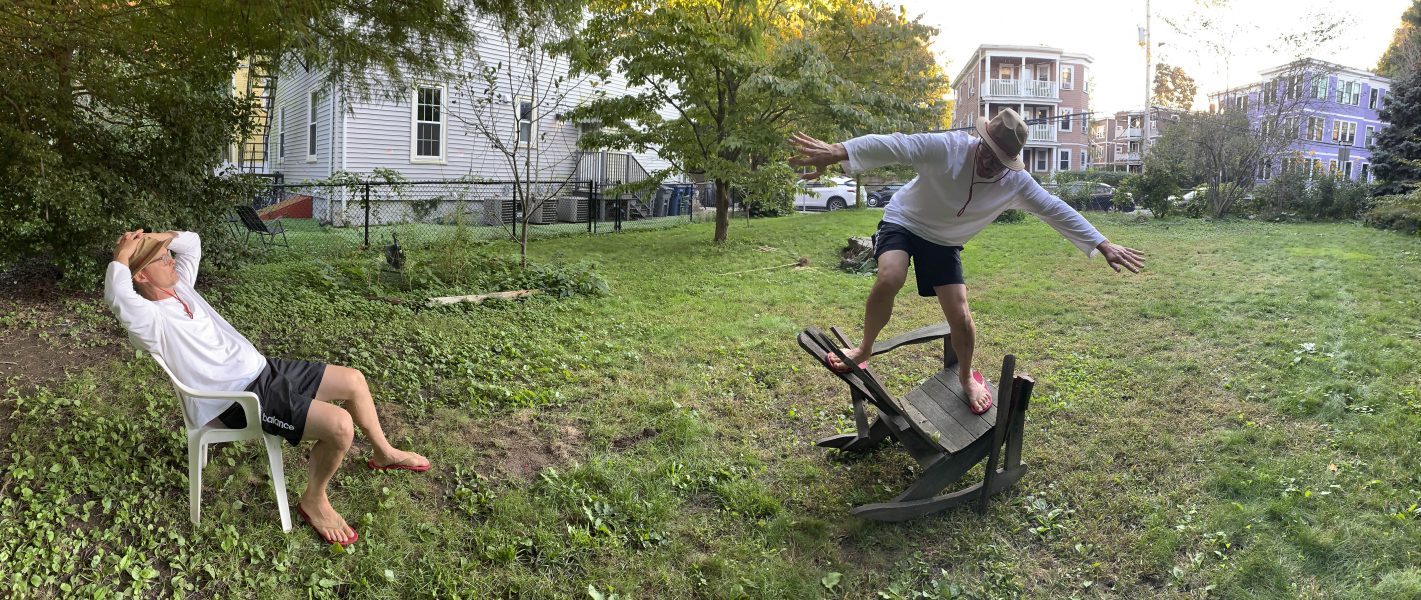
Photo by Gretjen Helene Photography.
Make a panoramic portrait that captures the various personalities of you and your family members! Choose an interesting background, use fun clothing accessories, and dive into your characters using the panoramic mode on your smartphone camera! Explore personalities, identities, and feelings through this fun family activity.

A panoramic photograph has a wider view than a typical photograph. Panoramic mode is a common setting on many digital cameras (including most smartphone cameras) and is often indicated by a curved or pinched rectangle symbol. Using the panorama setting, you can slowly move the camera across a scene to capture a wide area in your photograph. This is often used to capture vast landscapes and scenes surrounding the photographer.


1. Choose someone to be the photographer. Open the camera app on your device and search for the panoramic mode. Take a few test photographs to understand how panoramic mode works. While taking the picture, move the camera slowly from left to right to make a smooth panoramic photo.
2. Everyone else in your group will be in the photograph together. Each person should choose two feelings to express in the photo, for example “excited” and “curious.” Brainstorm how to express these feelings in the photo and consider using props, facial expressions, and/or poses to show the feelings.
3. Choose a setting or background for the photograph. Will you be outside or inside? What will you stand in front of? Choose an area where the photographer can be 5-10 feet away from everyone in the photograph, and decide where the photographer will be positioned.
4. Once the photographer is ready, the group should gather to the left of the photographer and pose for their first emotion, for example “excited.” The photographer will start taking the panoramic photo then announce when everyone should move to perform the second emotion.
The group should move behind the photographer, then pose in their second emotion (“curious”) to the right of the photographer. It’s important for the photographer to slowly move the camera from left to right to allow the group time to get into their second position. And it’s important for the group to move behind the photographer for best results. You may need to practice the timing and take a few test photos as a group before making your final photo.
5. Switch and Repeat: Let someone else in the group be the photographer and/ or choose different emotions and props to incorporate into your portraits.
Don’t have panoramic mode? You could still create personality portraits by taking one photo of your first emotion and another photo of your second emotion, and viewing them side by side! Try a whole collection of emotion photos to show the array of emotions you feel and personality traits you have!
Gretjen Helene is a visual artist and enthusiastic human who strives to embellish her world and other’s experiences with learning, healing, creativity, curiosity, gratitude, and joy. Her artistic endeavors are vast— as every arising opportunity is an exciting challenge— and so her work is not always consistent with a specific technique, style, or signature, but consistent is her motto: “The grass is greener where you water it.”
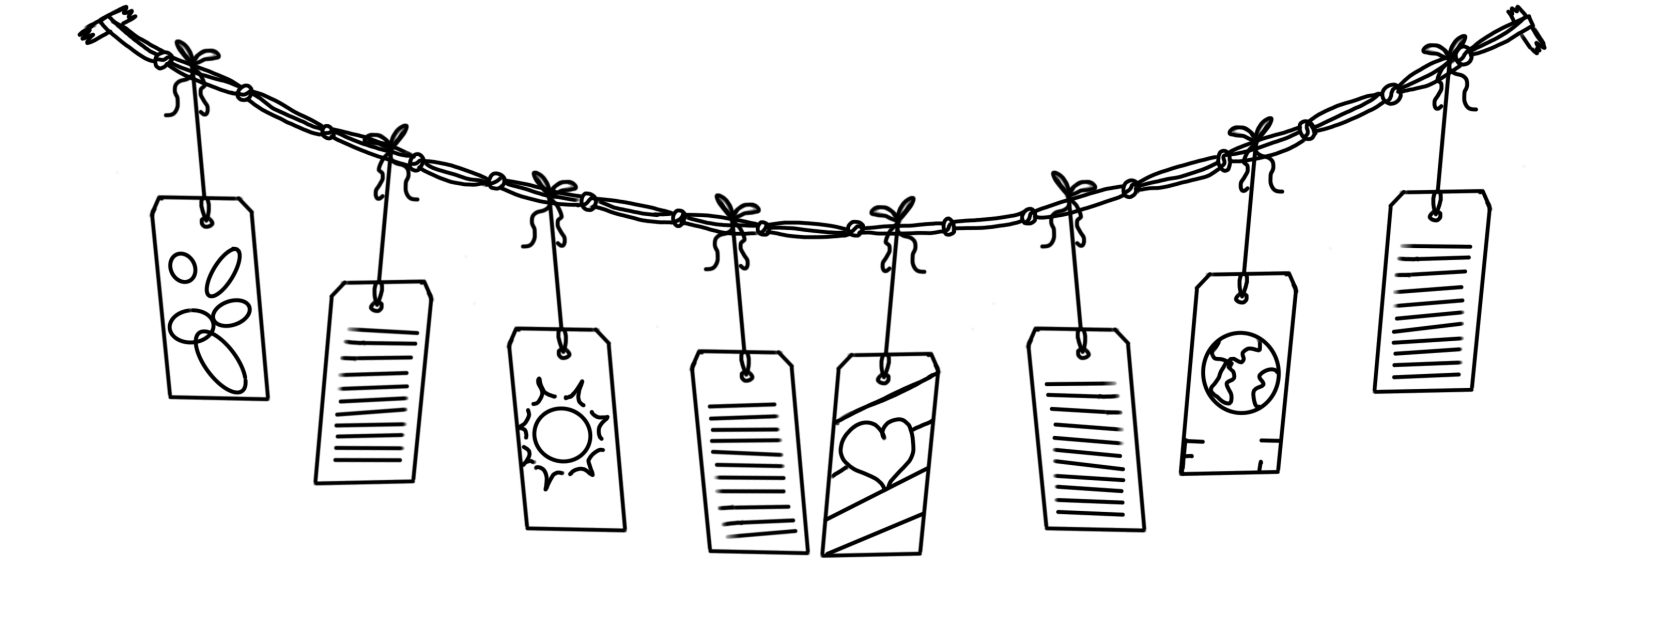
Create a Dream Chain to inspire the world you want to build. What would bring joy? What would make the world a better place for all? Seek inspiration from the ICA exhibition The Worlds We Make: Selections from the ICA Collection, where artists reimagine the world through their perspectives, then dream up a world of your own.
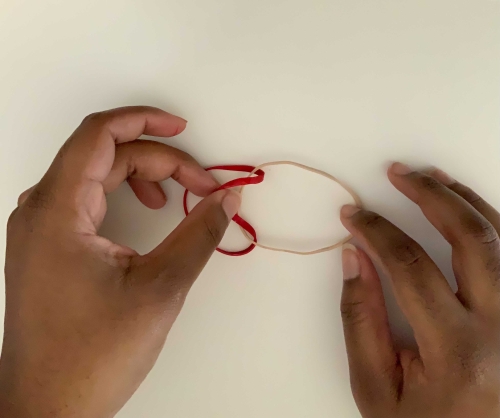
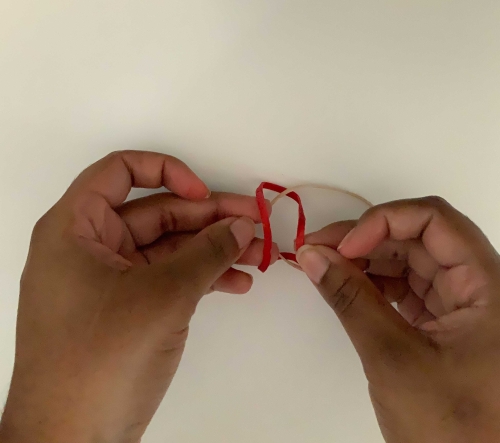
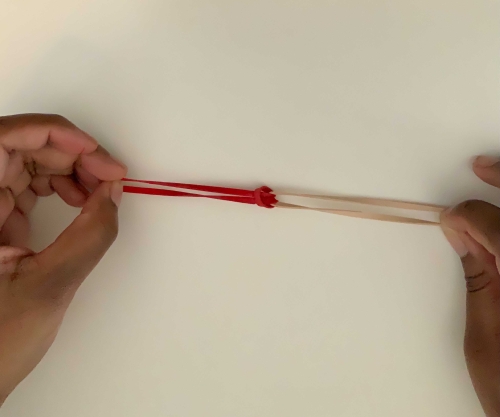
1. Link all of your rubber bands together to form a chain. Follow the photos or watch the video below.
a. To start your chain, place one rubber band on a flat surface, this will be band #1 (pictured as red). Place a second band (#2, pictured as beige) to the right of band #1, and slightly overlapping on the right side of band #1.
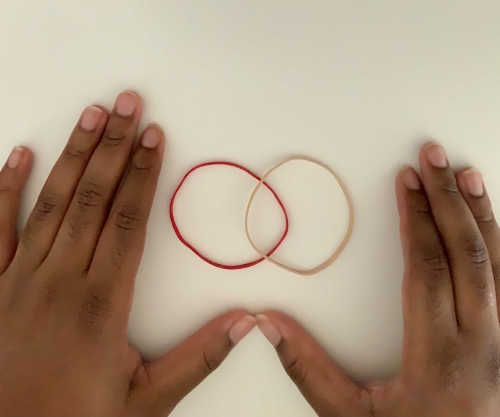
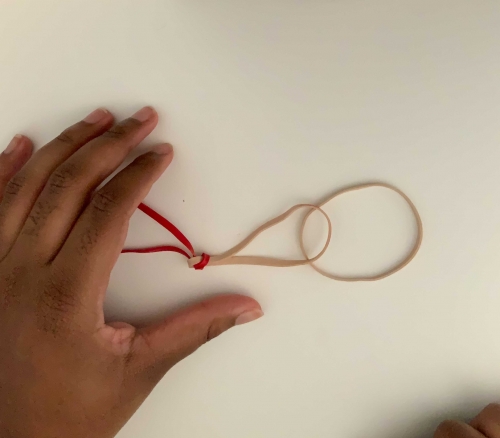
b. With your right hand, hold down band #2 to keep it from moving. With your left hand pinch the inner side of band #1, and lift it over band #2. Thread it through the loop, pulling it under the outer side of band #1. Pull tight and you have your first loop.
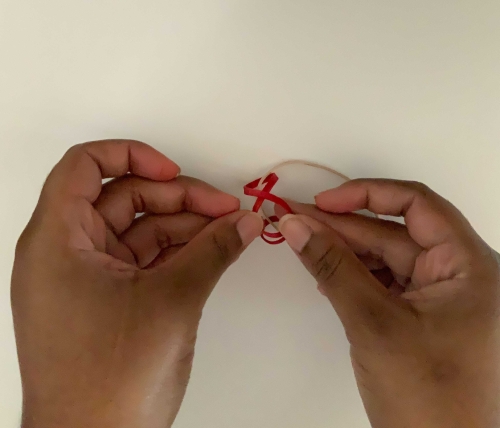
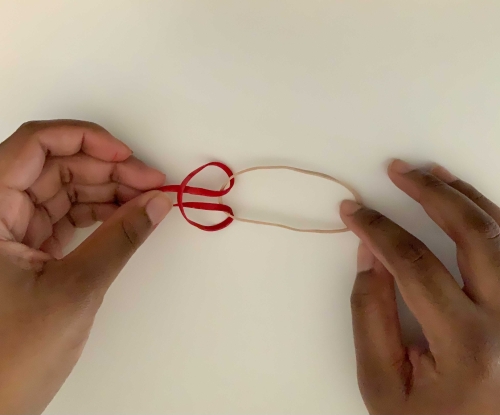
c. Repeat these steps on either the outside edge of band #1 or band #2. Keep repeating these steps until your Dream Chain is the length you want.

2. On individual tags, draw or write about the things that you would like to see in your world. Feel free to use both sides of the tags. To help inspire ideas, try answering the following questions:
Who are some people who make you feel happy?
What is your favorite animal(s)?
Where would you like to visit one day?
What is your favorite food?
What do you like to do in your free time?
If you had a super power, what would it be?
If you could change anything in the world, what would you change?
3. Attach each tag to your rubber band link by tying or taping the tag strings to the rubber bands.
4. Hang your Dream Chain somewhere special to remind you of the world you want to build.
Share your artwork on social media with #ICAartlab!
Find more activities here.
This activity was created by Flolynda Jean, Education Assistant, Studio Programs
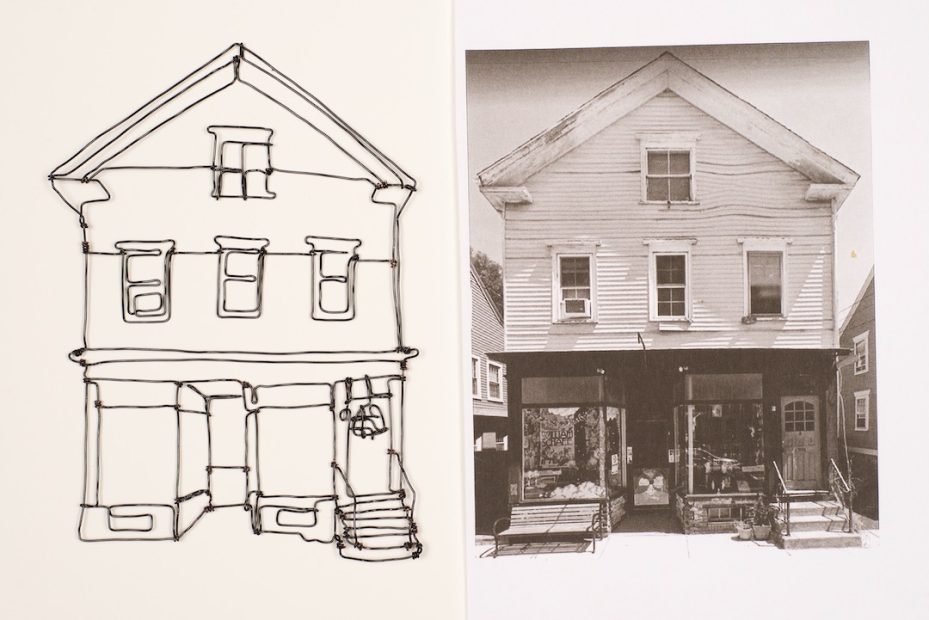
Photo by Pamela Murray
|
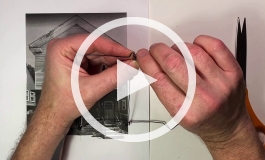
We all have places where we have been, where we want to be, and where we are right now. A place can cement memories, bring us comfort, and instill hope. In this project, you will create a line drawing with wire of a place from your past, present, or future that represents a moment of you. NOTE: This activity requires scissors and wire which can be sharp. |
Todos tenemos lugares en los que hemos estado, en los que queremos estar y en los que nos encontramos ahora mismo. Un lugar puede consolidar recuerdos, brindar consuelo e infundir esperanza. En este proyecto, crearás un dibujo lineal con alambre de un lugar del pasado, el presente o el futuro que represente un momento de tu vida. NOTA: Esta actividad requiere el uso de tijeras y alambre que pueden ser afilados. |
Materials / Materiales:
Instructions / Instrucciones:
|
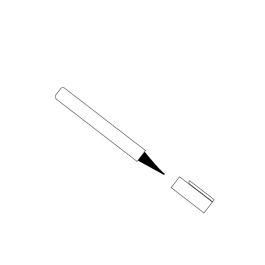
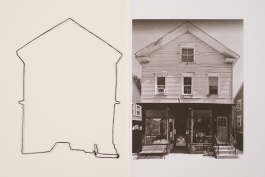
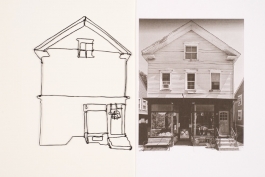
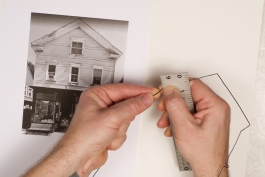
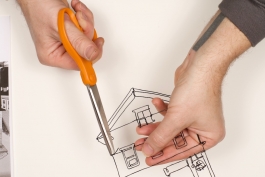
1. Choose a photo of a house or building that has been a part of your life. Print out or copy the photo in the exact size you want your wire drawing to be. (The wire will scratch the surface of your photo, so don’t use a copy that you want to keep.) You can also draw the house or building on a piece of paper roughly 5” × 7”. |
1. Elige una fotografía de una casa o de un edificio que haya sido parte de tu vida. Imprime o fotocopia la fotografía en el mismo tamaño que deseas usar para el dibujo. (El alambre raspará la superficie de la fotografía, así que no uses una copia que quieras conservar.) También puedes dibujar la casa o el edificio en un papel de alrededor de 5” × 7” (13 × 18 cm). |
|
|
|
|
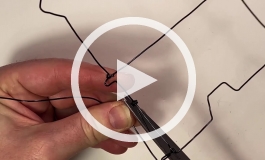
2. Outline the building with wire. Leaving an extra inch of wire at the start, begin in the lower right corner and trace around the structure. (You’ll use the extra inch of wire at the start for wrapping after getting all the way around.) |
2. Traza el contorno del edificio con alambre. Dejando una pulgada adicional de alambre al inicio, comienza en la esquina inferior derecha y traza el contorno de la estructura. (Usarás la pulgada adicional de alambre del inicio para cerrar después de dar toda la vuelta.) |
|
|
|
|
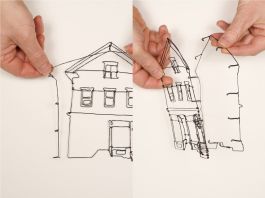
3. Outline the interior details. This can be done separately and then added to the whole piece (be sure to leave extra wire at the ends you want to attach) or worked from the same wire used for the building outline. |
3. Traza el contorno de los detalles del interior. Esto puedes hacerlo por separado y luego agregarlo a la pieza entera (asegúrate de dejar alambre adicional en los extremos que deseas unir) o con el mismo alambre que has utilizado para el contorno del edificio. |
|
|
|
|
4. Optional: Make a backing by outlining the building again but add a folded tab of about ¾ of an inch every 1 ½ inches or so. You will then fold these tabs around your first outline from the back to give your wire drawing more structure. |
4. Opcional: Para crear un apoyo, vuelve a trazar el contorno del edificio, pero agrega una pestaña doblada de alrededor de ¾ de pulgada (2 cm) cada 1 ½ pulgadas (4 cm) aproximadamente. Luego, dobla estas pestañas por detrás del primer contorno para darle más estructura al dibujo lineal. |
|

|
|
5. Use a marker or paint that matches the color of your wire to cover up the spots where the plastic coating has scratched off. |
5. Con un marcador o con pintura que sea del color del alambre, cubre los lugares donde se haya raspado el revestimiento plástico. |
|
Tips:
|
Consejos:
|
|
CW Roelle draws three-dimensional line drawings with wire. His images are studies of moods, thoughts, life, place, shape, and line. A graduate of the Maryland Institute College of Art and a MacColl Johnson Fellow, he lives and works in western Rhode Island. |
CW Roelle crea dibujos lineales tridimensionales con alambre. Sus imágenes son estudios de estados de ánimo, pensamientos, vidas, lugares, formas y líneas. Graduado en el Maryland Institute College of Art y destinatario de la beca MacColl Johnson, vive y trabaja en el oeste de Rhode Island. |
|
Share your artwork on social media with #ICAartlab |
Comparte tu obra de arte en las redes sociales con #ICAartlab
|